

A home seller privacy checklist is a short, written list of what strangers can see, copy or reach while your house is on the market, plus what you will do about each item. Selling a home asks you to open the front door, publish pictures of your rooms and hand a stack of personal paperwork to people you have never met. None of that is reckless by itself. It only becomes a problem when nobody decides, on purpose, where the line sits.
Most sellers think about price, repairs and timing, and privacy shows up as an afterthought on the day a buyer’s agent mentions that the photos include a visible mail pile. By then the pictures are already on dozens of websites. A home seller privacy checklist works best when you build it before the listing goes live, because the choices that matter most, such as which photos to take and who gets showing access, are cheap to make early and awkward to undo later.
This guide walks through the whole sale in order. First we look at what actually becomes public or reachable: listing photos, floor plans and data, showing access, closing files, bank details, smart devices, mail and the details that identify you. Then we cover practical ways to reduce exposure without slowing the sale, and finally a reset routine for after the keys change hands. Throughout, the aim is a home seller privacy checklist that is calm and proportionate, not paranoid.
One honest limit before we start. Privacy and recording laws, disclosure duties and listing rules differ from state to state and sometimes from one local board to another, and your contract and listing agreement control what you can ask of buyers and agents. Treat everything in this home seller privacy checklist as general education, and confirm local details with your agent, a real estate attorney, your title or escrow company or your state real estate commission.

Key takeaways
- Start with a map of exposure. A useful home seller privacy checklist begins by listing everything that becomes visible, from photos and floor plans to showing notes and the paperwork you hand over.
- Photos outlive the listing. Pictures are copied, cached and re-shared, so remove personal items, documents, valuables and identifying details before the photographer arrives, not after.
- Share documents on a need-to-know basis. Send only the pages a party needs, through a channel you chose, and keep identity numbers and account details off casual email. Write that rule into your home seller privacy checklist so it holds when you are busy.
- Treat smart devices as part of the house. Cameras, locks, thermostats, speakers and Wi-Fi all hold your data, so decide what stays on, what gets disclosed and what gets reset.
- Finish the job after closing. Forward mail through official channels, transfer or close accounts, hand over keys and codes, and store your sale records safely. Your home seller privacy checklist is not finished until this reset is.
What a home seller privacy checklist needs to cover before you list
Privacy during a sale is not one risk. It is a cluster of small ones that come from different places: the marketing materials, the people who tour the house, the paperwork trail and the gadgets on your walls. Sorting them into groups makes the problem manageable, because each group has its own owner, its own timeline and its own fix.
The first group is public by design. Photos, floor plans, the property description and the basic facts of the listing exist to be seen. The second group is semi-private: information that moves between you, your agent, the buyer’s side, the lender and the title company. Our approach is to treat the first group as a content decision and the second as a handling decision. A good home seller privacy checklist keeps both lists in front of you.
Who keeps the list matters. We suggest one owner, usually you, and one shared copy with your listing agent. A home seller privacy checklist that only you can see cannot stop a photographer from shooting the wrong room, and one that only the agent sees cannot cover your own devices. Share the marketing half, keep the account half private, and revisit both when the plan changes, for instance when a price reduction brings a second round of photos. That split keeps the home seller privacy checklist practical for everyone involved.
Photos, floor plans, listing data and the people who come through the door
Your listing is the most visible thing you will ever publish about your home. Pictures show how you live, what you own and how the house is laid out. A floor plan or a three-dimensional tour goes further and shows how rooms connect, where the bedrooms sit relative to the entrances and which windows face which side of the lot. Buyers love that detail, and it is reasonable to provide it. It also tells a stranger far more than a curbside look would.
Data is the quieter part. The public remarks, the showing instructions and even small phrases like “owner works nights” or “home is empty” become part of the record that agents, portals and sometimes unrelated websites repeat. Showing access adds a human layer: who is coming, when, with whom and how they were verified. Each of these is a decision, and each can be made with a little care and no drama.
Evidence to gather: what your listing already shows the public
Before you edit anything, look at what exists. Open your listing, or the draft your agent shared, and read it the way a stranger would. Zoom into every photograph and look at the edges, the reflections, the countertops and the walls. Read the remarks and the showing instructions word for word. If you are working with a photographer, ask for the full set of proofs, not only the favorites chosen for the listing.
Then search for your own address in a general web search and in the image results, and note what comes up from earlier sales, rental listings, insurance estimates or old real estate portals. Many sellers are surprised to find photos from a purchase years ago, with furniture, art or a child’s room still visible. You cannot always remove those, but you can know they exist and avoid repeating the same exposure with the new set.
Keep a simple tally on paper or in a note: what is visible, who controls it, and whether you want it changed. Items you control, such as your own staging, are easy. Items controlled by an agent, a brokerage, the MLS or a portal usually require a polite written request through the person who posted them. This inventory becomes the spine of your home seller privacy checklist, and it only takes an evening.
A photo-prep pass is the first practical entry on a home seller privacy checklist, and it benefits from knowing how photographers work. Our guide to real estate photography for sellers explains what to expect on shoot day, and it pairs naturally with the privacy habits below, because a house that is already tidy and depersonalized photographs better and reveals less.
A scenario, an exception, and your next step for photos and showings
Picture a seller we will call Dana, who lists a three-bedroom home and approves the photos in a hurry. A week later a neighbor mentions that the kitchen picture shows a whiteboard with the family’s weekly schedule, including the days nobody is home. Dana asks the agent to swap the image, and the agent does so within a day, but a few portals keep the old file for a while longer. Nothing bad happens. The lesson is that a ten-minute proof review would have been cheaper than a cleanup.
There are exceptions worth knowing. Some sellers have a real safety reason for tighter limits, such as a protective order, a stalking history or a public-facing job. If that is you, tell your agent and your attorney early and plainly. Options may include limiting exterior photos, using an alternate contact on the listing, or arranging showings through the agent only. You do not owe strangers your reasons, but your agent cannot protect what they do not know about.
Your next step is small and concrete. Add a proof review to your home seller privacy checklist, scheduled before anything is published, with a short written list of items to remove or crop. If you plan an open house, read our notes on open house safety for sellers too, since a public event exposes the interior and the people you cannot screen in advance.
Closing files, bank details, smart devices, mail and your identity
The second half of exposure is less glamorous and more consequential. A sale generates a paper trail: the listing agreement, the purchase contract, disclosures, payoff letters, identification copies, tax forms and wiring or payment details. Alongside it sits the digital layer inside the house, such as cameras, smart locks, thermostats, voice assistants and the Wi-Fi network that ties them together, plus the mail that keeps arriving with your name on it.
Identity data is the thread running through all of it. Your name, signature, date of birth, account numbers and a clear picture of your driver’s license are exactly what a criminal wants and exactly what a closing process legitimately collects. The task is to give the right people the right details through channels you trust, and to withhold the rest.
Evidence to gather: where your personal data sits during a sale
Begin with a list of who will hold what. Your agent or brokerage will usually have your contact details, the listing paperwork and copies of what you provide. The title or escrow company will collect identification, mortgage information and closing instructions. Your lender will have a payoff statement. The buyer’s side will see disclosures and sometimes tax or utility details. Write each name down with the documents they have received.
Next, list the devices. Walk through the house with a notepad and record every connected thing: doorbell camera, indoor cameras, smart lock, garage keypad, thermostat, smart speakers, television apps, alarm panel, router and any hub. Note which account each one is tied to and whether it records audio or video. A short tally of this kind often reveals a camera you forgot you owned, which is exactly the point of doing it.
Finally, list the mail and accounts that tie to this address: bank statements, insurance, subscriptions, tax notices, medical offices and deliveries. This list pays off twice, once while you are marketing the house and again at the end, when you change addresses. For handling the paperwork side, our guide to documents needed to sell a house shows which items you will actually be asked for, which helps you hand over what is required and nothing extra.
A scenario, an exception, and your next step for paperwork and devices
Consider a seller who keeps a smart speaker in the living room and a doorbell camera that records audio. A buyer’s agent walks a client through, the buyer comments quietly on the price they plan to offer, and later the seller realizes the device may have heard it. Whether recording like that is lawful or fair depends on local law and on whether notice was given, which is why the cleaner choice is to turn recording features off during showings and to say so in writing on the listing.
An exception worth planning for: a camera that protects a vacant or high-risk property. Some sellers keep exterior cameras running for security and place a visible notice. Rules on indoor cameras and audio vary widely, and many agents and buyers are uncomfortable when they exist, so ask your agent what local practice and your listing agreement say before keeping anything active inside.
Your next step is to add a device-by-device decision to your home seller privacy checklist: whether each item stays on, goes off during showings or comes out entirely. Put the decision in a note shared with your agent. If the home will be empty while it is listed, the companion piece on vacant home security while you sell covers the physical side of that same question.
Cutting exposure without stalling the sale
The goal is not to hide your house. A listing that tells buyers nothing sells slowly, and a seller who refuses every request becomes hard to work with. The goal is to give buyers what they need to decide and to keep everything else out of the file. A workable home seller privacy checklist treats privacy as a set of defaults that you can relax on purpose, rather than a wall that blocks the process.
Think of it as two dials. One controls what the public and the marketing channels see. The other controls what moves through private channels to people involved in the transaction. You can turn the first dial down quite a lot with almost no cost to the sale. The second dial needs more care, because that is where identity theft and payment fraud actually happen.
The table below is a quick risk and verification matrix. Use it as a reference while you read the later sections: find the situation, check the evidence in the second column, take the safe action in the third, and keep the fourth column in mind as a list of things you never send. The final column tells you when to bring in someone with more authority than you.
| Threat or claim | Evidence to check | Safe action | Never share | Escalate to |
|---|---|---|---|---|
| Photos reveal valuables, documents or schedules | Zoomed proofs, mirrors, counters, walls, screens | Remove items, retake or crop, request swaps in writing | Mail, IDs, prescriptions, key locations | Listing agent, then brokerage manager |
| Unknown visitor asks to tour without an agent | Agent license, brokerage, showing request record | Route through the listing agent and book by appointment | Door codes, schedule, whether anyone is home | Listing agent; local police if threatening |
| Request for ID copy or Social Security number by email | Sender address, known phone number of the title company | Call a number you already trust, use the secure portal offered | Full ID images, account numbers, SSN over open email | Title or escrow officer, attorney |
| “Updated” payment or wire instructions arrive | Compare with the original instructions and call to confirm | Stop, phone the verified contact, confirm in person if needed | Bank login, one-time codes, PINs | Your bank, title company; IC3 report if money moved |
| Camera or smart device still recording during tours | Device app settings, account sharing list, notice posted | Disable audio and indoor recording, post a clear notice | Account passwords, shared logins | Agent; attorney for local recording rules |
| Open house sign-in sheet collects visitor data | Who keeps it, whether it is shared or sold | Ask the agent to keep it private and in the agent’s control | Your own contact details on the sheet | Brokerage manager |
Read the matrix as a habit, not a script, and fold it into your home seller privacy checklist. The same three questions apply to almost everything in a sale: who is asking, how do I know, and what is the smallest piece of information that answers the question. When those questions have a calm answer, you can proceed. When they do not, the pause costs you very little.
Your own risk level shapes how strict to be. A seller in a busy neighborhood with a family at home has different concerns from one holding a vacant rural property, and both differ from someone with a personal safety reason to stay out of public view. We would rather you scale the rules to your situation than copy a stranger’s. Write the home seller privacy checklist for your house, and let the higher-risk items, such as a safety concern or an empty property, get the stricter treatment.
Photo, showing and access controls that keep buyers interested
Listing controls are the easiest wins on any home seller privacy checklist because they sit in your own hands and your agent’s. They also make the house look better. Buyers are shopping for a home they can imagine as theirs, and your personal items are in the way of that picture. Depersonalizing helps privacy and marketing at once, which is why it belongs near the top of any home seller privacy checklist.
Access controls matter just as much. A clear process for who can enter, when and with what verification protects you and also protects the agents who visit. Good showing procedures are not hostile to buyers. Most real buyers and their agents expect an appointment, a short wait for confirmation and a lockbox or supervised entry.

The graphic above turns the home seller privacy checklist into three passes: what to remove before photos, what to adjust in the listing text, and what to set up for showings. Use it as a walk-through list on the day before the photographer arrives, and again before any open house or broker preview.
Evidence to gather: your listing agreement, MLS settings and showing rules
Privacy options live in paperwork, so read it before you finalize your home seller privacy checklist. Your listing agreement may describe how your photos and information can be used, who owns the images, how long they may stay online and whether the brokerage can use them for marketing after the sale. Ask directly whether the photos remain on the brokerage’s website or portfolio after closing, and whether you can request removal. Terms differ, and the answer should be in writing.
Ask your agent how your listing is distributed. Most listings feed through a local multiple listing service into many portals, which means a change at the source can take time to ripple outward. Ask what the showing instructions currently say, whether they mention that the home is vacant or that you are away, and what verification the showing service performs before it releases a code or a lockbox combination.
Also ask about practical details: whether the lockbox is electronic and logs each opening, how showing feedback is collected and who sees it, and whether a visit by an unscheduled agent triggers a notice to you. Having these answers lets you make real decisions. For preparation steps beyond privacy, our walk-through of how to prepare a house for showing covers the routines most agents recommend.
A seller’s worked example: tightening access for a house with a long driveway
Take an illustrative case. A seller lives alone in a house at the end of a long driveway, with a home office she uses to work. She wants buyers to see the property but does not want anyone to know her work hours or that she lives alone. With her agent she removes the desk photos, keeps the exterior shots wide rather than showing the entry gate and keypad, and asks the agent to write “appointment only, 24-hour notice requested” instead of anything about when she is home.
The agent also arranges for showings to go through a scheduling platform that verifies agent credentials, and the seller leaves the house during every visit. Showings run a little less spontaneously than they might otherwise, and two agents grumble about the notice period. The house still sells to a buyer who toured by appointment. The cost was a few days of flexibility, and the benefit was a quieter mind.
The exception here is any request that does not fit the procedure. If someone claims to be an agent but has no appointment, or insists on touring at an odd hour, the answer is the same polite sentence: please contact my agent. A real buyer’s agent will do exactly that. For a fuller look at in-person risks, see the guidance on showing safety when you sell without an agent, which applies to many of the same screening ideas.
Document, account and device controls for the paper and digital trail
The second set of controls covers what you send, store and connect. This is where small habits make the biggest difference, because most identity problems linked to a sale start with a casual email, a reused password or a document sent in full when a page would have done. None of this requires special software. It requires deciding, before you are busy, how information will move.
Start with one rule for your home seller privacy checklist: send the minimum, to the verified recipient, by the channel your title or escrow company recommends. Keep a record of what you sent and when. Treat any message that changes the plan, such as new payment details, an urgent request for information or a link to sign in, as a reason to stop and confirm by phone. Our companion guide on real estate email phishing aimed at sellers goes through the common patterns in detail.
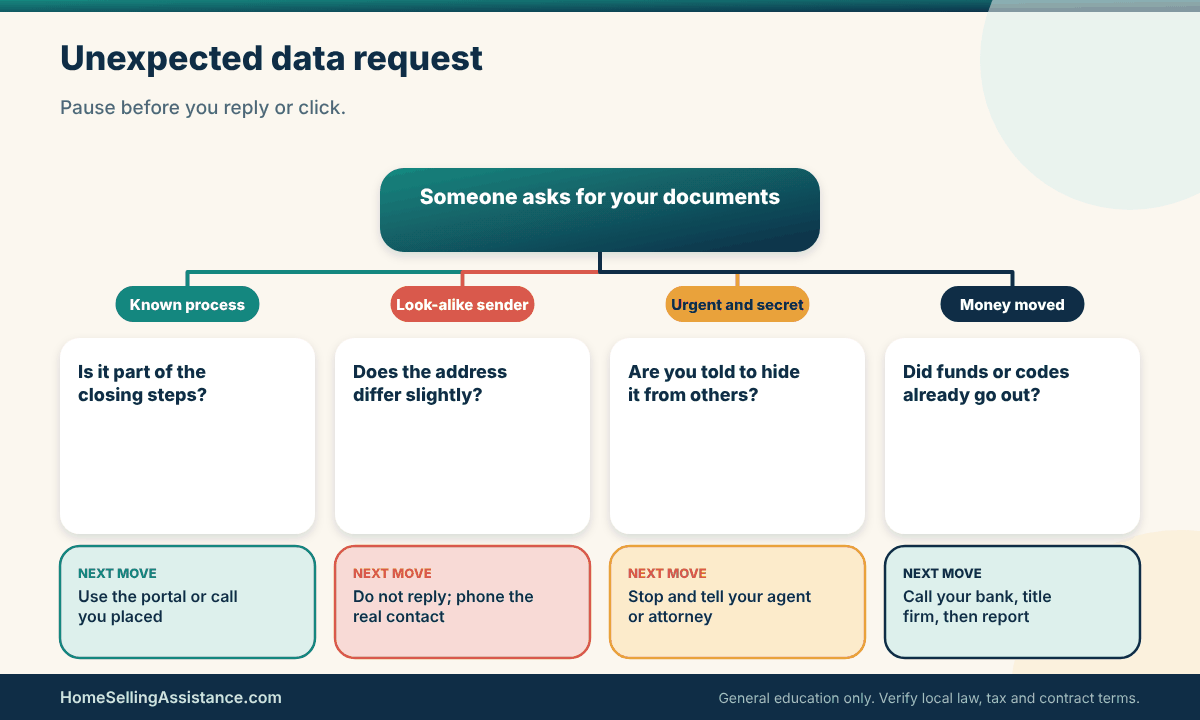
The decision tree above, a small piece of any home seller privacy checklist, shows what to do when a request for personal information shows up unexpectedly. The branches are simple: verify who is asking, decide whether the request is part of the known process, and send only what the process requires through the channel you control.
The network inside your house deserves a line on your home seller privacy checklist too. Router names and passwords are easy to forget, and guests who connect during showings or open houses may join your main network. Many routers offer a separate guest network that keeps visitors away from your cameras, printers and computers. Changing the main password after the sale is a sensible step, and so is removing any smart devices you plan to take with you before the buyer arrives.
Evidence to gather: who actually needs which document, and why
Make a short table in your notes, as part of your home seller privacy checklist, with three columns: the document, the person who needs it and the reason. A payoff statement goes from your lender to the title company. A disclosure form goes from you or your agent to the buyer’s side. Your photo ID goes to the title or escrow officer for the closing. Your bank account details go only where you are receiving funds, and only to a party you have independently verified.
When someone asks for something that is not on your list, ask why and who will hold it. Reasonable parties answer plainly. Be wary of requests that mix urgency with secrecy, such as “send it today and do not mention it to your agent.” A legitimate request in a real transaction can almost always survive a phone call. You can also ask for redacted copies, where account numbers are partly hidden, whenever the full number is not needed.
Check how your own records are stored too, since a home seller privacy checklist covers your files as well as theirs. A shared cloud folder is convenient, but if you send a link to the whole folder, everyone with the link sees everything inside it. Create a separate folder for what you are sharing, set the link to expire if the service allows it and turn off sharing when the need ends. Our seller identity fraud at closing guide explains why identity details attract criminals in the first place.
Where sharing goes wrong: a scenario and the safer next step
Here is an illustrative situation. A seller receives an email that looks like it comes from the title company, asking for a scan of her driver’s license and a voided check “to prepare the closing.” The sender’s address differs by one letter from the real domain, which she does not notice. She is about to reply when her agent, copied on an earlier thread, mentions that the title company uses a portal. She calls the officer on the number printed on her contract, and the request turns out to be fake.
The exception to remember is the legitimate version of the same request. Title and escrow companies really do need identification and bank details in a real sale, so refusing everything is not the answer. The answer is to know how they collect it, usually a secure portal, an in-person signing or a call you place yourself, and to use only that route.
Your next step is to write down the official phone number and portal address of each party now, copied from your contract or the title company’s own paperwork. Do not take numbers from emails. If a message ever pushes you to send money, see the notes on real estate wire fraud for sellers, and if something already went wrong, the FBI’s Internet Crime Complaint Center accepts reports of internet-enabled fraud.
Closing the loop: your home seller privacy checklist after the sale
Many sellers treat the closing table as the finish line. For privacy, it is more like halftime. The buyer now owns a house full of your old habits: a garage code you set years ago, a thermostat logged in to your email, a doorbell still paired to your phone and a mailbox that keeps receiving your name. Clearing those out is the last chapter of a complete home seller privacy checklist, and it is usually the one people skip.
The reset has two parts. One is physical and digital handover, where you pass on what the buyer needs and take back what is yours. The other is housekeeping, where you move your accounts, mail and records to your new address and secure the sale documents you must keep. Both parts are easier if you start the list during the contract period, while you still know where everything is.
Before the detailed steps, the next table works as a scenario guide for the whole transaction, including the closing period. It lists a situation you might meet, the warning sign to look for, the channel to use for checking, how to respond and which record to keep. Skim it now, and return to it whenever something unexpected arrives.
| Situation | Warning sign | Verification channel | Seller response | Record to preserve |
|---|---|---|---|---|
| Photographer finishes the shoot | Proofs show mail, screens or documents | Written message to the listing agent | Ask for swaps before publication | Email listing the images changed |
| Agent you do not know requests a same-day tour | No appointment, pressure to skip the process | Showing platform or the listing agent’s known number | Politely decline until verified | Request log and the reply sent |
| Message asks for ID or bank details | Look-alike address, urgency, request for secrecy | Title company phone number from your contract | Pause, call, use the secure portal only | Original message and call note |
| Buyer asks for smart device access | Request for shared logins or account passwords | Agent-to-agent written request | Offer a reset device or a manual handover | Written handover list |
| Closing day nears and mail keeps arriving | Statements still addressed to the old house | Official postal change-of-address site | Update accounts and file forwarding | Confirmation and account checklist |
| Weeks after closing, an unexpected bill or notice appears | Account, loan or credit item you do not recognize | The company’s official number and credit reports | Report it and consider a credit freeze | Dated notes, letters and report copies |
Use the table as a quick conversation starter with your agent or title officer, and attach it to your home seller privacy checklist. If you can say what the warning sign is and how you will verify it, you are already ahead of most scams. The final column also doubles as your evidence file, which becomes valuable if a dispute or a fraud report ever follows the sale.
Timing is the quiet enemy of the reset. Contract deadlines, final walkthroughs and moving trucks all compete for the same few days, and privacy tasks lose that contest unless they are already written down. This is why a home seller privacy checklist drawn up at the start of the sale beats one improvised on closing morning. Assign each reset item a date relative to closing, such as seven days before, closing day or seven days after, and the work spreads itself out.
Devices, mail, accounts, records and keys: the handover list
Handover items fall into two bins: things that stay with the house and things that leave with you. Garage remotes, keypad codes, mailbox keys, manuals and warranties usually belong to the buyer and are often covered in the contract. Your personal accounts, cloud logins, saved passwords and anything tied to your email belong to you, and they should disconnect from the property before the buyer takes possession.
The two bins sometimes blur. A smart thermostat can stay but should not stay logged in to you. A doorbell camera might convey with the home, yet the video history and account link are yours to remove. Clarify these items in writing before closing, so that nobody discovers at move-in that a device is still reporting to your phone.

The balance graphic above sorts the common items on a home seller privacy checklist into what to hand over and what to take back. Use it to prepare a written handover list that your agent can pass to the buyer’s agent, so each side knows what is staying and in what state.
Evidence to gather: device accounts, mail trail and the keys you handed out
Reopen the device inventory you added to your home seller privacy checklist earlier and add one column: what must happen at closing. For each connected device, check whether it can be removed from your account, factory reset or transferred through the manufacturer’s process. Most apps have a “remove device” or “transfer ownership” option, and the manufacturer’s support page explains the exact steps. Do the work where you can verify it, such as on your phone while standing in the house.
For keys, write down everyone who has ever held one: neighbors, relatives, cleaners, dog walkers, contractors and agents. Smart locks make this easier because you can delete user codes one by one, but physical keys need a conscious count. If the locks will not be changed before the sale closes, tell your agent so that the buyer can decide whether to rekey. Ask for a written note of how many keys, remotes and fobs were handed over.
For mail, make a list of the senders you expect over the next several months. Banks, insurers, tax offices, medical offices, subscription services and employers all hold your old address. Moving day is easy to rush, so decide now who gets a new address first. If the home sits empty before closing, our notes on selling a vacant house explain how mail pileups signal vacancy to passersby.
When the handover goes sideways: exceptions and the next step
Imagine a seller who forgets one thing: the garage keypad still has a code she gave to a house sitter two years ago. At the final walkthrough the buyer’s agent asks about codes, the seller realizes the sitter’s code still works and deletes it on the spot. The close call was easy to prevent with a written key and code list, and it cost nothing because it happened before closing.
Exceptions deserve a plan, too. If the sale is delayed and you must stay past the planned date, your device handover moves with it, and a rent-back or extended-possession arrangement should say who controls the locks and devices while you remain. If you are moving out before closing, the timing guide on move-out date versus closing date shows how to line up possession with the paperwork.
The next step is simple: print the handover list from your home seller privacy checklist and give copies to your agent and the title or escrow officer. Keep your own copy with the dated confirmation that each item was done. A short record like that settles most “who had the code” questions before they turn into arguments.
A post-closing home seller privacy checklist you can finish in a weekend
After the keys change hands, the remaining work is administrative and stays manageable if you break it into windows. The first day covers the urgent items: mail forwarding, utility transfers and device removals. The first week covers the accounts that tie to your address. The first few months cover the slower tail of notices and the credit monitoring that gives you early warning if something was missed.
Nothing on a post-closing home seller privacy checklist requires expert help, but a few steps involve official sites where a fake lookalike is easy to find. When you file a change of address, type the official postal service address yourself rather than clicking a sponsored result, because paid imitators exist. Check any fee against the official site before you pay.

The phase graphic above splits the post-sale home seller privacy checklist into the first day, the first week and the first months. Tick items off as you go, and note the date, so that you have a simple record if a problem turns up later.
Evidence to gather: closing documents, account changes and credit reports
Start by collecting your closing documents in one secure place, either a locked folder or an encrypted digital folder with a strong password. Keep the settlement statement, the deed or transfer paperwork you received, payoff confirmation, proof of any repairs or credits and the records that show what you paid for the home and its improvements. Our guide to the seller closing statement explains how to read the main document, and the IRS explains record-keeping for home sales in Publication 523.
Then list the accounts to update: banks, credit cards, insurers, employers, tax and motor vehicle agencies, voter registration, subscriptions, medical providers and delivery services. Change the address with each one directly, using the number or site on a recent statement. Keep the old address in view for a few months, because late bills and tax notices sometimes arrive after you think you are finished.
Finally, look at your credit reports. U.S. consumers can request free reports from the three national credit bureaus through the official federal channel, and the FTC’s consumer information site explains how to place a freeze or fraud alert if anything looks wrong. A sale produces a burst of credit activity, such as payoff inquiries and sometimes a new loan, so a quick review a few weeks later is sensible.
Paper records need a decision as well. Keep the documents that support your sale, as discussed above, and sort the rest: old payoff letters, drafts, duplicate disclosures and printed emails can usually go through a shredder rather than the recycling bin. Digital copies on a phone, laptop or cloud account deserve the same sorting. A tidy folder with a clear name makes the last step of a home seller privacy checklist simple, because you know what to keep, where it sits and when it can safely go.
Month-two surprises: a scenario, an exception and your next move
Suppose a seller receives a letter eight weeks after closing from a lender he does not recognize, addressed to him at his new apartment. It claims he opened a credit line. He checks his report, finds an account he never opened and acts quickly: he contacts the lender through its official number, files an identity theft report through the federal consumer protection site and freezes his credit. The earlier habit of keeping dated records makes each step faster.
The exception is the harmless surprise. Not every unfamiliar letter signals fraud. Mortgage servicing transfers, escrow refunds, final utility bills and homeowners insurance refunds all show up after a sale and can look odd. The fix is the same: check through an official channel, never through the contact details in the letter itself, and compare with your closing paperwork.
Your next step is to set a reminder for thirty, ninety and one hundred eighty days after closing. At each point, scan your reports and mail, confirm that old devices no longer show up in your accounts and review the records folder. If your sale involved a deed or title concern, the guide on title and deed fraud for homeowners covers what to watch in the property record.
Our broader pillar, home sale fraud and seller safety, ties these habits together, and the fraud and seller safety category collects the related guides. Keep that reset page near your home seller privacy checklist so the last items get done.
Quick scenario
A couple lists their home and keeps going to work as usual. Their home seller privacy checklist, written in twenty minutes on day one, says: proofs reviewed before publishing, indoor cameras off during tours, showings by appointment only, documents sent through the title company’s portal and a handover list ready for closing. Nothing dramatic happens during the sale, which is the whole idea. Good privacy habits tend to look like an uneventful transaction.
Frequently asked questions about home seller privacy checklist
What should a home seller privacy checklist include?
At minimum, it should cover listing photos and floor plans, the text of the listing and showing instructions, who can enter and how they are verified, the documents you share and with whom, smart devices and cameras, mail and accounts, and a post-closing reset. Write each item with an owner and a date, and share the marketing half with your agent. A home seller privacy checklist that lives on one page and gets checked off is far more useful than a long guide you never reopen.
Is it normal to ask the photographer to avoid certain areas?
Yes, and photographers hear such requests often. Tell the photographer and your agent in advance which rooms or items to skip, such as a home office, a gun safe, medicine cabinets or a child’s room. Review the proofs before anything is published. If an image is already live, ask your agent in writing to replace it, and remember that portals may take time to update their copies.
Can I turn off my security cameras during showings?
Generally you can control your own devices, but check your listing agreement and local recording rules with your agent or attorney. Many sellers switch off indoor cameras and audio, keep exterior cameras on with a visible notice and tell the agent what remains active. Rules about notice and consent differ from place to place, so the safest course is to disclose what is recording and keep it to a minimum.
Should my address appear on the open house sign-in sheet?
The sheet is meant for visitors, so your own details do not belong on it. Ask your agent who keeps the sheet and what happens to the names afterward. Some brokerages share the contact details with partners or use them for marketing, and policies differ. Request that it stay under the agent’s control and that no personal information about you is included.
How do I know a request for personal documents is real?
Ask who is requesting it, why it is needed and how they want it delivered. Then check by calling a phone number you already have, taken from your contract or the title company’s own paperwork, not from the email. Real transaction parties can answer those questions without fuss. Messages that stress urgency, secrecy or a change of plan deserve extra caution, and our phishing guide for sellers lists common patterns.
Do I have to hand over smart home accounts to the buyer?
No, and you should not share your own logins. A better approach is to remove the device from your account, reset it to factory settings or help the buyer set up a new account on it. Put the plan in writing before closing so both sides know what stays. Some devices cannot transfer, and the manufacturer’s support pages explain what is possible.
What should I do with mail that keeps arriving after the sale?
File an official change of address through the postal service and update each sender directly using details from a recent statement. Do not discard mail meant for you without checking whether it needs action. If you see mail for accounts you do not recognize, treat it as a possible warning sign and review your credit reports through the official federal channel.
How long should I keep my sale records?
Keep the closing statement, improvement records and anything that supports your tax reporting for as long as your tax adviser or the IRS guidance suggests, which can be several years after a sale. The IRS explains home sale reporting in Publication 523, and our guide on home sale tax records covers what to file. Store copies securely, ideally in two places, and shred paper you no longer need. Put the retention date on your home seller privacy checklist so it is not forgotten.
What if I think my information was misused after closing?
Act promptly and keep notes. Contact the company involved through its official number, review your credit reports, consider a fraud alert or freeze, and report identity theft through the FTC’s consumer site. If money was lost, contact your bank and the title company at once and consider filing at the FBI’s complaint center. A lawyer can advise on your specific situation.
Make the plan small enough to use
A home seller privacy checklist does not need to be long, only specific and written down. Review your photos before they publish, control who walks through, share documents through channels you verified and reset devices, mail and keys when the sale ends. This article is general education, not legal, tax or financial advice, and local rules vary, so lean on your agent, attorney, title company and official sources for your own details.


