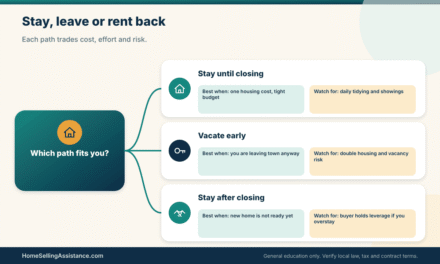
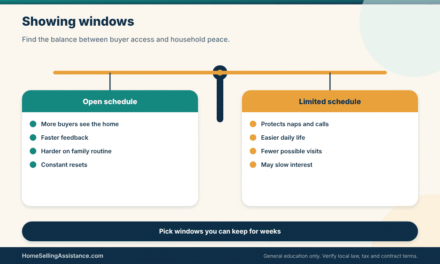
A solid seller checklist before listing does one job above all others: it makes sure that when the first buyer, agent or inspector asks you a question, you already have the answer, the paper behind it, and a date attached to every decision still open. A good seller checklist before listing is not a to-do list of cosmetic chores. It is a way of collecting the facts of your house, your loan and your own timing before the public clock starts ticking.
Most sellers do the visible work first. They paint, they scrub, they book a photographer, and only then discover that the deed has a name spelled two different ways, that the mortgage servicer needs ten days to produce a payoff letter, or that a past roof repair has no receipt anywhere. None of those problems is fatal. All of them are cheaper to find in week one than in the middle of a negotiation.
This guide builds your seller checklist before listing in the order that tends to save the most trouble: paperwork and numbers, then repairs and pricing, then photos and logistics, then the written confirmations that tie everything together. It sits inside our wider how to sell a house roadmap, and where a topic deserves its own deep dive we point you there instead of repeating it.
One note on tone. We have no stake in whether you hire an agent, sell on your own, or take a direct cash offer, so the list works for any route. Where rules differ by state, county or contract, we say so plainly and tell you who to ask.
Key takeaways
- Start with paper, not paint. Ownership, loan and tax documents decide how fast you can act, and they are the slowest items to obtain.
- Every open question needs an owner and a date. “Find out later” is how listings go live with gaps.
- Price, repairs and photos depend on each other. Pick the order deliberately so you do not pay twice for the same job.
- Disclosure rules vary by state. Learn your state’s form and the federal lead-paint rule before the first showing, not after the first offer.
- Get the key terms in writing. Listing terms, access rules, what stays with the house and who pays for what should never live in a text thread.
- Keep the file after closing. Tax questions and buyer claims can surface long after the sale, and your records are your first defence.
Before we get into the list itself, here is the picture of the whole journey. It shows the four stages of preparation and where the heavy lifting usually falls, so you can see why we start with documents and finish with records.

Build your seller checklist before listing around one working file
Think of the next few weeks of seller checklist before listing work as assembling a single working file, paper or digital, that anyone helping you could open and understand. A good file has three layers. The first holds documents. The second holds numbers, such as what you owe, what you pay monthly and what the house might realistically sell for. The third holds people and dates: who you will call, and by when each decision must be made. A full seller roadmap covers the strategy; this section covers the raw material.
The file behind your seller checklist before listing matters even if you plan to hand everything to an agent. A professional can only work with what you provide, and the quality of the file shapes how quickly questions get answered once buyers show up. A tidy seller checklist before listing also gives you a baseline to compare against when someone proposes a price, a repair or a closing date.
Documents, numbers, contacts, and deadlines for your seller checklist before listing
For the first section of a seller checklist before listing, start with the documents that prove you can sell the property at all. That usually means your deed or other vesting document, your most recent mortgage statement, the latest property tax bill, and any homeowners association paperwork. If the home is held in a trust, an LLC, or a shared title, add the document that shows who may sign. For a broader catalogue, our guide to the documents needed to sell a house goes item by item.
Next come the numbers. Write down your loan balance as shown on the statement, the lender’s name and the servicing phone number, your annual property tax amount, HOA dues and any special assessments, and your typical utility costs. These are not the final figures that appear on a closing statement. They are a starting sketch, and you will refine them with real quotes later.
Then add contacts and deadlines. Contacts means everyone who might have to produce something: the mortgage servicer, the HOA management company, your title or escrow office, any contractor with an open warranty, and your insurance agent. Deadlines means every date you already know, such as a lease ending, a job start, a school year, or a mortgage rate lock on the home you plan to buy.
Evidence to gather: the papers that answer buyer questions first
Buyers and their agents ask the same handful of questions again and again, so build your evidence around them. Is the title clean? What is the property tax situation? Has anything been repaired, replaced or permitted? What do the HOA rules say about rentals, pets and fees? Each question has a document that answers it, and having that document ready shortens the back-and-forth considerably.
For condition, gather receipts, warranties, permit records and any past inspection or pest reports. For systems such as the roof, furnace, water heater and electrical panel, note the age if you know it and the date of the last service. If you do not know, say so on the sheet rather than guessing. An honest “unknown, original to the house” is far safer than a confident wrong date.
For the property’s legal side, ask your title company or local county recorder’s office what they can pull for you. Many offices can show recorded liens, easements and the legal description quickly, and a preview often reveals old items such as an unreleased loan or a recorded agreement with a neighbour. A deeper look at that process is in our piece on the title search for a home sale.
Finally, collect the paper trail for anything you will promise to leave behind. If the washer, the playset or the mounted television stays, write it down now, with a note on whether it is included in the price. Surprises over what conveys are among the most common small disputes, and they are entirely avoidable.
A scenario, an exception, and your next step for paperwork
Here is a made-up example. A seller we will call Dana plans to list in three weeks. She pulls her mortgage statement and finds that the loan is serviced by a company different from the one she paid two years ago. She also realises the deed names her and her late husband. Neither issue stops the sale, but the second one means she will need documents that show who now holds authority to sign.
The exception worth remembering is that every state treats such situations differently. Some allow a surviving spouse to clear title with a simple recorded affidavit, while others require a court step. Dana should not guess. Her next step is a short call to a title company or a local real estate attorney, asking what is needed in her county and how long it usually takes.
The lesson is not about Dana’s particular facts. It is that your checklist should have a column called “who can answer this,” because the right answer is often a local professional rather than a website, including ours. A fast call in week one costs far less than a failed closing in week eight.
A last practical habit: photograph or scan every document as you collect it and name the file clearly, such as “2026 property tax bill” or “roof receipt 2019.” A tidy folder on your phone or a cloud drive saves you from digging through a shoebox when a buyer’s lender asks for something on a Friday afternoon.
Information still missing when your seller checklist before listing looks finished
A list that looks complete usually is not. The gaps tend to hide in places sellers assume someone else handles: the exact payoff amount, the real cost of a recurring HOA fee, whether past repairs were permitted, or whether a recorded easement crosses the back yard. Spend an hour on a deliberate gap hunt of your seller checklist before listing. Read each document and ask what question it raises rather than what question it answers.
Another common gap is the family or co-owner conversation. If two people share title, both need to agree on the price range, the acceptable timeline and who will sign. If an adult child is helping a parent sell, someone needs to confirm who holds legal authority. These are human conversations, and putting them on the list as dated items keeps them from drifting.
How to turn an unknown into a dated question
Every unknown should be rewritten as a question with an owner and a due date. “Roof age?” becomes “Ask the previous owner’s agent or search permit records by Friday.” “HOA special assessment?” becomes “Email the management company for a resale package and ask the turnaround time.” Once an item on your seller checklist before listing has a named person and a day, it stops being worry and starts being a task.
Be realistic about turnaround. Mortgage payoff statements, HOA resale certificates and certified copies of recorded documents can each take days or more than a week, and the times vary by company and county. Ask about the typical wait when you make the request, and write it on your calendar. If something has a long lead time, start it first, even if it feels less urgent than the paint.
Also separate what you can verify from what you can only estimate. A tax bill is verifiable. The value of the kitchen is an opinion. Mark each item with a V or an E in your notes. It sounds fussy, but it keeps your own planning honest and helps you explain your assumptions when you talk with an agent or a buyer.
When the missing piece is a person, not a paper
Sometimes the absent item is not a document but a decision-maker: a former spouse who must sign, a sibling who has not replied, a landlord for a tenant-occupied property, or a lender who has to approve a short payoff. In those cases, the paper does not help until the person responds, so the seller checklist before listing item should be a conversation with a date, plus a fallback if the date passes.
A practical rule is to ask early and in writing. A short email that states the request, the reason and the date you need an answer leaves a record and reduces misunderstanding. If the person is slow or unwilling, that is the moment to involve a real estate attorney, because the options differ widely depending on state law, the type of ownership and any court orders.
If you are still deciding when to begin all this, our article on when to start preparing a house to sell helps you set a calendar that fits your situation, and the selling process and timeline category collects related guides in one place.
The table below turns the first stage of the work into a workflow you can copy. Each row is a stage you will probably pass through, what to collect there, what to do with it, when the decision usually has to be made, and who receives the result next. The deadlines are relative on purpose, because your calendar and your local market set the real dates.
| Stage or symptom | Information to gather | Action | Decision deadline | Next handoff |
|---|---|---|---|---|
| Ownership unclear | Deed, trust or estate papers, names of all owners | Confirm who may sign; call title company | Before any agent interview | Title office, attorney |
| Loan questions | Latest statement, servicer contact, payoff process | Request payoff quote in writing | At least two weeks before listing | Agent, escrow office |
| Unknown condition | Receipts, permits, past reports, system ages | Decide on a pre-listing inspection or not | Before pricing talks | Agent, inspector |
| Price uncertainty | Recent nearby sales, active competition, your must-net figure | Compare two or three opinions of value | Before photos are booked | Agent, photographer |
| Home not show-ready | Punch list, quotes, declutter plan | Fix, credit, or disclose each item | Before first showing | Contractors, stager |
| Rules to disclose | State disclosure form, HOA papers, lead-paint status | Complete forms honestly and fully | Before first offer is accepted | Agent, buyer |
Use this seller checklist before listing table as a prompt, not a script. If your loan is already paid off, the loan row disappears and something else, perhaps a lien check, takes its place. What matters is the habit of pairing every stage with evidence, an action, a date and a recipient. Stages that lack a recipient are the ones that tend to be forgotten.
Work the pre-listing steps in order, not all at once
Once the paperwork is moving, the temptation is to start everything at the same time. Resist it. On any seller checklist before listing, some jobs unlock others. You cannot choose the right repair budget until you have a price range, and you cannot book photos until the house is actually ready, and you cannot set a realistic list date until you know how long the slowest document will take. Sequencing is where a seller checklist before listing earns its keep.
The sections below follow a practical order: early actions and the decisions they force, then the handoffs to the people who will take over parts of the work. Treat each handoff as a moment when information leaves your head and enters someone else’s hands, because that is where details get lost.
Early actions and the decisions they force
In the first couple of weeks you will usually be making three linked decisions: what condition to present the house in, what price range to aim for, and what timeline you can live with. These pull against each other. A faster listing may mean fewer repairs and a lower expected price. A longer preparation may improve presentation but cost carrying money every month. Write all three down together on your seller checklist before listing so you see the trade-off rather than deciding each in isolation.
Resist the urge to treat a single online estimate as the answer. Automated valuations are a conversation starter at best, and a thin local data set can make them wobble. For a more careful approach, our guide on how much your house is worth explains how sales comparisons work and why two sensible people can land on different numbers.
Repairs, pricing, and photos: what to check before you pay anyone
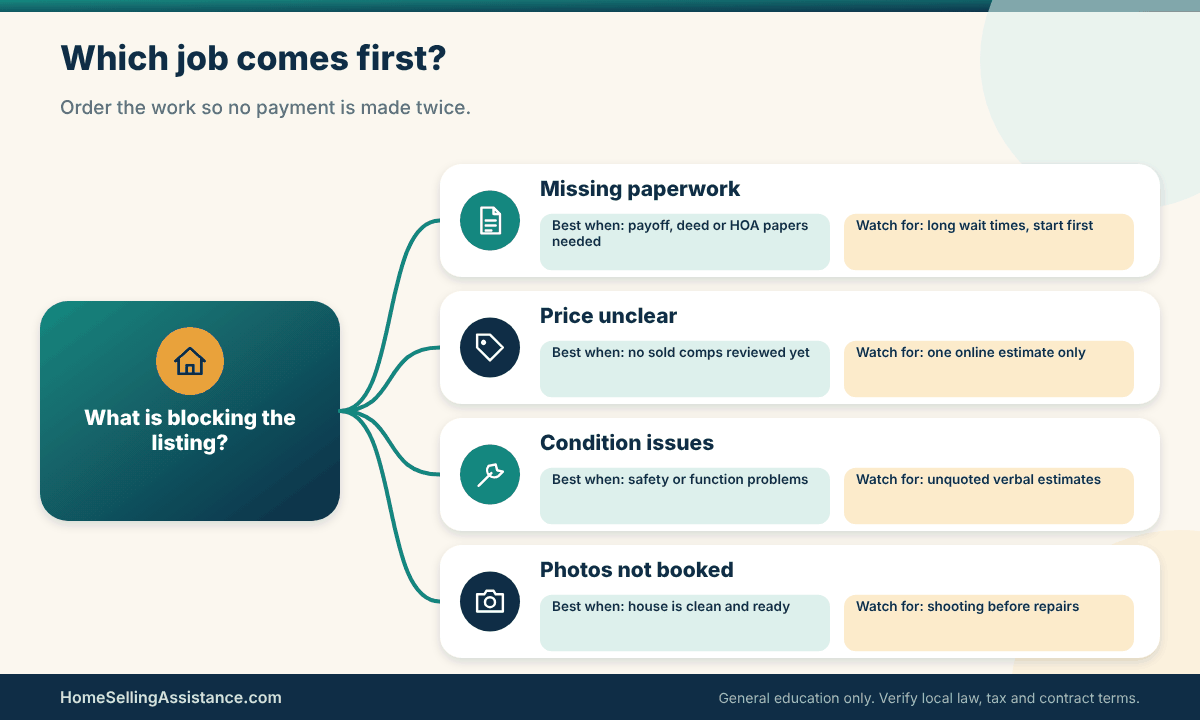
Before you spend on repairs, walk the house with a notebook and sort every issue into three bins. The first holds safety or function items, such as a leaking pipe, a dead outlet or a failing step. The second holds cosmetic items that affect first impressions, such as worn paint or a cracked tile. The third holds things you would simply tell a buyer about and let them decide. Each bin gets a different treatment, and our guide to repairs before selling a house goes deeper into the choices.
Pricing evidence comes next. Ask for a written comparative market analysis from at least two sources if you can, and read the sold comparisons, not just the active listings. Ask each person how they adjusted for differences in size, condition and location. If the explanation is vague, that is information too. For more on the thinking, see how to price a house to sell.
Photos should be booked last in this trio, not first. Pictures taken before the repairs and decluttering are finished lock in a weaker first impression, and reshooting costs time and sometimes money. A helpful rule is to schedule the photographer only after the punch list is done and the house has been cleaned, with enough buffer for weather and rescheduling. Our article on real estate photography for sellers covers what to prepare.
Whenever you hire someone, ask for a written scope and price. A one-line text saying “sure, around that much” is not a quote. Ask what is included, what would change the price, and how long the work will take. If a contractor will not put a number in writing, treat it as a signal to compare with someone else before you commit.
The picture below lays out the decisions in the order that avoids double payment, and shows how each choice feeds the next.
A short scenario on sequencing the early weeks
Imagine a couple, Marcus and Elena, who want to list in six weeks. In week one they request a payoff statement and an HOA resale package, because both have long lead times. In week two they invite two agents to give opinions of value and also collect quotes for a small plumbing repair. In weeks three and four they declutter, repaint two rooms and finish the repair. In week five they book photos. In week six the listing goes live.
Notice what they did not do. They did not pick a list price before seeing comparisons, they did not book photos before the house was ready, and they did not start painting before they knew the plumbing job might open a wall. Those choices look small on paper, but each one avoids a wasted payment or a rework.
The exception to a leisurely seller checklist before listing is a rushed sale. If you have a hard deadline, such as a relocation start date, some steps compress and others get skipped on purpose. The seller checklist before listing still helps, because it shows you what you are skipping and what risk comes with it, rather than leaving you to discover it later. Our guide to the home selling timeline shows how stages overlap when time is short.
Your next step in either case is to put real dates on your seller checklist before listing calendar. A plan without dates is a wish. Add two buffer days between dependent tasks, because contractors run late, photographers cancel for rain and documents arrive on the last day rather than the first.
Handoffs to agents, photographers, and buyers: how the seller checklist before listing travels
A handoff is any moment when work or information passes from you to someone else. You hand the paperwork to an agent or an attorney, the repair list to a contractor, the house to a photographer, and eventually the keys to a buyer. A seller checklist before listing should name each handoff in advance, with what you will give, what you expect back and by when. Most misunderstandings in a sale, and most gaps in a seller checklist before listing, are really handoffs that were never defined.
The same logic applies to a seller checklist before listing if you sell without an agent. You become the person who passes everything along, so you need a cleaner file, not a thinner one. Our overview of selling for sale by owner explains which tasks fall to you in that route, and the listing agents and commissions category helps if you are still weighing professional help.
Who needs what from you, and in what form
Agents typically want your documents, your goals and your constraints. If you are interviewing several, give each the same information so you can compare answers fairly. Ask each to explain how they would market the house, what the listing agreement would require of you, how long it would run and how compensation is structured. Compensation is negotiable and has to be written down in the agreement, so read that part slowly and ask for anything unclear to be explained.
Photographers and stagers want access times, a clean house and a list of features you would like emphasised. Give them a short written brief with the dates, the parking situation, how to handle pets and what should be out of sight. A page of notes prevents the awkward moment when a toy bin appears in the hero shot of your living room.
Title or escrow offices want legal names exactly as they appear on the deed, the loan details and any known liens. Mismatched names or missing middle initials cause delays more often than you would expect. If your name has changed through marriage, divorce or correction, bring the supporting document and ask whether the title office needs additional paperwork.
Buyers, through their agents, will eventually want your disclosure forms, any reports you have chosen to share and a clear list of what is included in the sale. Offer these in one organised packet rather than in scattered emails. A tidy packet signals that the house has been cared for, and it limits the number of follow-up questions that can slow a decision.
Whatever the audience, send information in writing and keep a copy. A phone call is a fine way to explain something, but follow it with a short email summarising what you said. That habit protects you and the other person from fading memories, and it creates a record you can consult if a question arises later.
A scenario where a handoff goes wrong, and the repair
Suppose a seller verbally tells a photographer the house will be ready on Thursday. On Thursday morning the carpet cleaners cancel, the garage is still full of boxes and the photographer arrives anyway. The seller scrambles, the photographer reshoots only part of the home, and the listing goes live with an uneven set of pictures. Nobody was careless, but the handoff had no written date, no checklist and no fallback.
The repair is simple. Confirm the date in writing forty-eight hours ahead, send a one-page readiness list and agree in advance what happens if the house is not ready. Many photographers have a rescheduling policy, and asking about it when you book costs nothing. A little structure in your seller checklist before listing turns a tense morning into a calm one.
The exception to watch for is a handoff involving legal or financial authority, such as signing a listing agreement or a power of attorney. There, do not rush. Read the document in full, ask what each clause means, and consider asking a real estate attorney to review it. Our guide to the listing agreement points out the terms sellers most often overlook, from length to cancellation rights.
Your next step is to add a short handoff list to your seller checklist before listing for your own situation. Name each person, the thing you will give them, the date, and the thing you expect back. If a row has no expected return, ask yourself why you are handing it over at all.
For a second layer of protection, keep a simple log of who you have contacted, when and what was agreed. It can be a notebook page or a note on your phone. When several people are working on your sale at once, the log is often the only way to remember who promised what.
The picture below shows how information flows between you and the people who handle each part of the sale, which makes it easier to spot where a link is missing.

Handoffs also include the handoff to risk. As soon as the house is listed, strangers will walk through it, and information about you and your property will spread. Our guide to home sale fraud and seller safety covers how to protect your identity, verify buyers and keep valuables out of sight, and it deserves a read before the first showing.
The second table moves from workflow to risk. It looks at the issues that most often surface between the day you decide to sell and the day an offer is accepted, and it pairs each with the evidence you can bring, the input you will likely get from the buyer side, the risk of ignoring it and a fallback. Read this seller checklist before listing table as a conversation starter with your agent, attorney or title officer, not as a verdict on your own house.
| Issue | Seller evidence | Buyer, agent or title input | Risk if ignored | Fallback |
|---|---|---|---|---|
| Unreleased old lien | Payoff letter, recorded release | Title search results | Delayed or failed closing | Pay off at closing from proceeds |
| Unpermitted work | Permit search, contractor records | Buyer inspector, lender questions | Renegotiation or lost buyer | Disclose, permit after the fact, or offer credit |
| Pre-1978 construction | Age records, prior reports | Agent supplies federal lead notice | Missed required disclosure | Provide pamphlet and sign the acknowledgment |
| HOA fees or assessments | Dues statement, resale package | HOA manager, buyer lender | Surprise costs at closing | Order package early; adjust price or credit |
| Price opinion gap | Sold comparisons, adjustment notes | Two or more agent opinions | Stale listing or underpricing | Set a review date and a price-change rule |
| Items that convey | Written inclusions and exclusions list | Purchase contract language | Dispute at final walk-through | Attach the list to the contract |
To use the table, pick the two or three rows that apply to your house and read across. If the seller evidence column makes you uneasy, that is the cue to start gathering it today. If the buyer, agent or title input column surprises you, ask that person a direct question. And if the fallback is a decision you would rather not make under pressure, make it now, while nothing is at stake.
Notice how many rows end with “disclose” or “credit” rather than “fix.” Disclosure and negotiation are often more practical than a perfect house, though the right call depends on your state rules, your contract and your risk tolerance. A real estate attorney or your state real estate commission is the best source on what your state requires you to say.
Close the loop on your seller checklist before listing
The last stage of a seller checklist before listing is the one people skip because the house looks ready and the energy is gone. It is also where small ambiguities turn into big ones. Closing the loop means two things: confirming the key terms in writing before the listing goes live, and organising your records so that anything that happens later has a paper trail. Neither part of the seller checklist before listing takes long, and both reward the seller who does them early.
Think of this stage of the seller checklist before listing as a final read-through with a skeptical eye. You are asking whether another person, seeing only your paper, could understand what you have agreed to, what you have promised and what remains open. If the answer is no, the gap is worth fixing now. A related article on what happens after accepting an offer shows how those same questions return once a contract is signed.
What to confirm in writing before the listing goes live
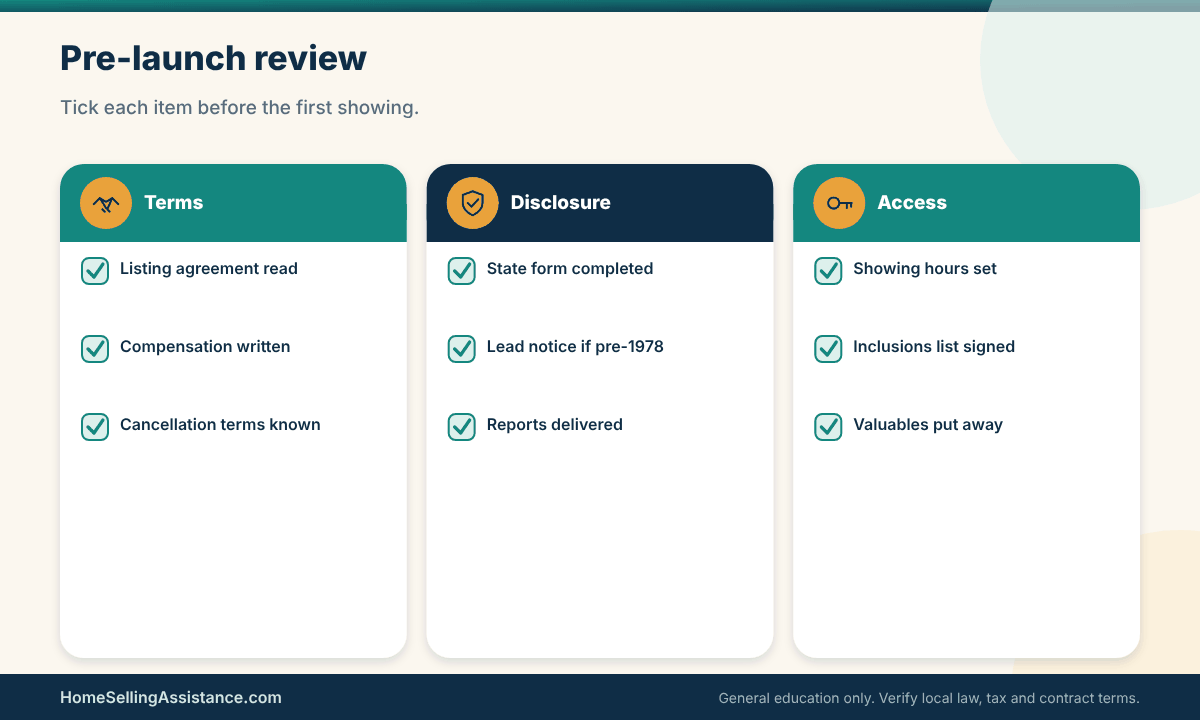
Four groups of terms on a seller checklist before listing are worth confirming in writing. The first is the listing arrangement: who represents you, for how long, what services are included and how compensation is structured. The second is access: who may show the house, with how much notice, and whether you want to be present. The third is inclusions and exclusions: what stays and what goes. The fourth is your disclosure package: what you have reported and what you have chosen to share.
Written does not have to mean formal. A clear email, replied to and saved, can capture a minor term such as showing hours. But for anything with financial or legal weight, such as the listing agreement or a contract addendum, you want the real document, read in full and signed only when you understand it. If something feels rushed, slow down and ask for time, or ask a professional to read it with you.
Evidence to keep: the written confirmations that matter
On a seller checklist before listing, keep a copy of the signed listing agreement and any amendments, since later disputes often turn on the exact words. Keep the disclosure forms you completed and the date you delivered them. Keep your list of what conveys with the house, ideally signed or attached to the purchase contract. Keep any quotes or invoices for repairs you made or promised. These documents are not exciting, but they answer the questions a buyer or attorney might ask years later.
On disclosure, the federal baseline applies to homes built before 1978: sellers must provide the lead-based paint pamphlet and disclose known lead hazards, and buyers get an opportunity to inspect. The EPA real estate disclosure page explains the requirement. Beyond that, state forms differ widely, so check with your state real estate commission or a local attorney. Our article on seller disclosure requirements shows the usual categories.
Honesty is the safest policy when you finish your seller checklist before listing. If you know about a problem, such as a past leak, a pest treatment or a boundary question, the usual guidance is to disclose it as your state requires rather than hope no one asks. Concealing a known issue can create legal exposure that far outweighs the cost of a repair or a price adjustment. If you are unsure what counts as material, ask your agent or attorney before you complete the form.
Fair housing rules apply at this stage too. Your listing, your showing instructions and your conversations with buyers must not express a preference or limitation based on protected characteristics. The HUD fair housing resources explain the categories. If you ever wonder whether a comment or requirement crosses the line, stop and ask a professional.
One more piece of evidence is a record of your own decisions. Write a short note on why you chose a price range, why you skipped or made a particular repair and which opinions you consulted. It is not a legal document. It is simply a memory aid that helps you stay consistent when a buyer asks a question or pushes back.
A scenario, an exception, and the next step on written terms
Consider a seller, Priya, who tells her agent by phone that the dining room chandelier stays with her. The listing photos show the chandelier, the buyer assumes it is included, and the contract says nothing either way. At the walk-through the buyer is upset, the seller is surprised, and a minor item threatens a smooth closing. A single line in writing would have prevented the whole episode.
The exception is when a fixture is attached to the house. In many places, attached items are treated as part of the property unless the contract says otherwise, but local custom varies, and what counts as a fixture can be a point of argument. If you want to keep something that looks permanent, say so in the listing remarks and in the contract, and ideally replace it before photos if you do not want questions.
Priya’s next step would have been to list every item she was unsure about and ask her agent how the local contract handles it. She would then write the answer into the listing and, later, into the purchase agreement. The same approach works for appliances, window coverings, sheds, hot tubs and anything else a buyer might reasonably expect.
The visual below turns this part of the seller checklist before listing into a short pre-launch review, so you can tick through the confirmations one by one before the listing goes live.
A final pre-launch step many sellers forget is a dry run of the first showing. Walk through as if you were a buyer. Is the key accessible, are the lights on, is the thermostat comfortable, are valuables and medications put away, and can a stranger find every room without help? Our article on how to prepare a house for showing includes a checklist that pairs well with this walk-through.
Records and follow-up from the active listing through closing and beyond
Once the listing is live, your seller checklist before listing turns into a record-keeping habit. Save every offer, counteroffer, inspection report, repair request and email thread. Write down the dates you sent or received each item. If you handle things by phone, jot a note afterwards. In a sale with several moving parts, a simple chronological file is worth more than a perfect memory.
After closing, keep the final closing statement, the deed you signed, the payoff confirmation from your lender, and records of any improvements you made while you owned the home. The improvements matter for tax reasons, and the closing statement matters for almost everything else. A good rule is to keep them in a labelled folder and back them up somewhere other than your phone.
What to file and where to check how long to keep it
For tax records, the IRS explains how to figure gain on a home sale and the exclusion for a main home, which in general allows up to $250,000 of gain for a single filer and $500,000 for joint filers if the ownership and use tests are met. The details, including exceptions, are in IRS Publication 523, and records of purchase price and improvements are explained in IRS Publication 551.
Your own tax outcome depends on your facts, so use these publications for education and ask a qualified tax professional about your return. Our article on taxes when selling a home gives a plain-language overview of the main concepts, from basis to reporting, without attempting to predict any individual result.
For non-tax records, a common approach is to keep sale documents for as long as a professional suggests for your situation, and longer if a dispute is possible. Retention advice depends on your state, your tax situation and your risk tolerance, so ask your attorney or accountant. When in doubt, digital copies cost almost nothing to store, and the peace of mind is worth the few minutes of scanning.
Keep contact details, too. Names and phone numbers for the closing officer, the agent, the inspector and any contractor who worked on the house can be valuable if the buyer asks a question later. People change jobs and companies close, so save the information while it is easy to find, and note the date of each call or email in your file.
A scenario about a question that arrives years later
Picture a former seller who receives a letter two years after closing. The buyer says the water heater, which the seller replaced shortly before listing, has failed and asks whether it was installed properly. Because the seller kept the invoice, the installer’s name and the disclosure form that described the replacement, the conversation is short and factual rather than anxious.
The exception is a claim that involves something you did not know or could not have known. Even then, a good file helps your attorney understand the timeline quickly. Nothing here is a promise about how any claim would end, since outcomes depend on state law and the contract. The point is that organised records give you options, and missing records take them away.
The next step for your seller checklist before listing is simple: before you move out, create a folder, scan the documents and write one paragraph summarising the sale. Include the key dates, the price, the parties and anything unusual. Future you will be grateful, and so will anyone helping you with taxes or a question from the buyer.
To see how the final numbers fit together, our guide to home sale net proceeds walks through how the closing statement is built, and the closing costs and net proceeds category gathers more detail on each line.
The last image in this seller checklist before listing guide shows a simple fallback path for the most common snag between listing and closing, which is a document or approval that arrives later than planned. It is worth a glance now, before you need it.
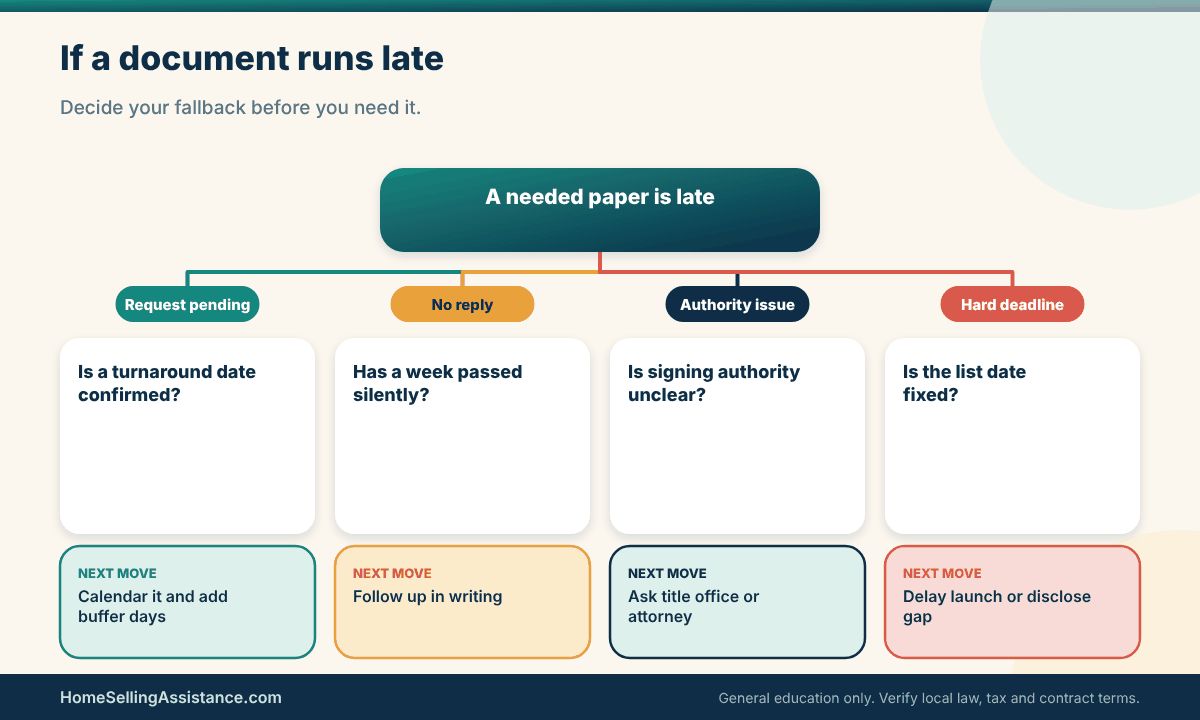
Quick scenario
A seller has three weeks before a planned list date. She spends the first afternoon requesting a payoff letter and an HOA resale package, the second day collecting two price opinions, and the rest of the first week on a one-page repair list. Painting waits until the quotes are back. Her seller checklist before listing is a single page with dates beside each item, and it is the first thing she shows her agent. The date, not the paintbrush, is what keeps her on schedule.
Frequently asked questions about seller checklist before listing
What should a seller checklist before listing include at minimum?
At minimum, it should cover ownership and loan documents, a rough sketch of your costs and target figures, a condition review with receipts, pricing evidence, disclosure forms and a set of dated tasks. It should also name the people involved and the handoffs between them. A good seller checklist before listing is short enough to use and detailed enough that someone else could pick it up. If yours runs to many pages, group it by stage so it stays workable.
How early should I start working through the list?
Start the items with long lead times first, such as payoff requests, HOA packages and certified copies of recorded documents. Those can take days or longer, and the wait varies by company and county. Many sellers begin several weeks before they want the house on the market, but your own timeline depends on the condition of the home and your personal deadlines. Our guide to when to start preparing a house to sell helps you pick a start date.
Do I need a pre-listing inspection?
It is optional in most places, and sellers weigh it differently. An inspection can reveal problems early and let you decide whether to fix, credit or disclose them. It can also create a written record of issues you must then handle honestly. Read about the trade-offs in our piece on the pre-listing home inspection, and ask your agent or attorney how it would interact with disclosure rules in your state.
Should I fix everything before I list?
Usually not. Safety and function problems are the strongest candidates for repair, since they tend to worry buyers and lenders most. Cosmetic work may be worth doing if it is inexpensive and affects first impressions, but it depends on your market and budget. Some sellers prefer to offer a credit or adjust the price instead, and each approach has trade-offs you should discuss with a local professional.
Can I use the same seller checklist before listing if I sell without an agent?
Yes, and you will probably need it more. Without an agent, you carry the tasks of pricing, marketing, paperwork and coordination. The seller checklist before listing stays the same, but more of the rows have your name next to them. Consider hiring a real estate attorney or a flat-fee service for parts you are unsure about, and read your state rules on required forms and contracts.
What disclosures do I have to make?
The federal rule requires lead-based paint disclosure for most homes built before 1978. Beyond that, disclosure duties vary widely by state, and some states require a standard form while others rely on different rules. Ask your state real estate commission or a licensed attorney what applies to you. When something feels uncertain, the safer path is generally to ask before you answer rather than after a buyer asks.
How do I price the house before I list it?
Start with recent sales of similar nearby homes, then consider current competition and the condition of your property. Ask for written reasoning from more than one source, and compare how each adjusts for differences. No single estimate is certain, and markets shift. Our article on how to price a house to sell walks through the method in more detail.
What if I discover a problem partway through the list?
Pause and sort it into one of three categories: fix it, price around it or disclose it. Get written quotes for any repair, and ask a professional how the issue might affect disclosure and the buyer’s lender. A delay of a week or two is often less costly than listing with a known gap. If the problem involves ownership or liens, speak with a title company or attorney early.
What should I keep after the sale closes?
Keep the final closing statement, the deed, your payoff confirmation, disclosure forms, repair receipts and records of improvements. These support your tax reporting and help you answer questions from a buyer. How long to keep them depends on your situation, so ask a tax professional. Digital copies in more than one place are a sensible habit, and they cost almost nothing.
Before you list
A seller checklist before listing will not make the market kinder or guarantee a particular price, speed or result. What it does is give you a file, a sequence and a set of dated decisions, so that surprises arrive while you still have options. Start with the slowest documents, keep the rest in order, and put every key term in writing. This article is general education, not legal, tax or financial advice, so check your state rules and speak with a qualified professional about your own facts. For the broader picture, return to our seller roadmap.