If you plan to declutter house before selling, the real job is not tidying. It is deciding, room by room and box by box, what the next owner gets to see, what moves out early, and what you still need within arm’s reach until closing day.
Most sellers who try to declutter house before selling start in the wrong place. They grab a trash bag, attack the kitchen junk drawer on a Sunday afternoon, feel great for two hours, and then stall when they reach the garage. The pile of half-sorted boxes in the hallway ends up looking worse than the clutter did. Photos get scheduled, the calendar fills up, and the stress builds.
This guide gives you a calmer order of operations for how to declutter house before selling. We will cover how to size the job, how to sort without agonizing, where packed things can live, how to keep a normal household running while buyers tour, and how to put the right items in writing so nobody argues about the curtain rods at closing. Nothing here is a promise about price or speed. It is a practical method you can adapt to your home and your local market.
It also sits inside a bigger picture. If you want the full staging story, our home staging guide for sellers covers the whole sequence, and this article zooms into the single task that usually comes first and takes longest.
Key takeaways
- Start with a deadline, not a closet. Work backward from your photo date and first showing, then size the job honestly before you buy a single box.
- Use five destinations. To declutter house before selling, every item goes to one of five places: pack, store, donate or sell, discard, or keep accessible. Anything that has no destination becomes the clutter you started with.
- Storage is part of the plan. A packed garage or a stuffed storage room shows up in photos and on tours, so budget for off-site space or a pod before you commit.
- Leave a livable house. A small accessible-essentials box and a daily reset routine keep you functional while the home stays showable.
- Put inclusions and exclusions in writing. Fixtures, appliances and decor you plan to take belong in the listing and the contract, not in a verbal promise.
- Keep the house decluttered through closing. The buyer’s final walkthrough is the last time anyone looks, so protect the effort you made.
Build the plan before you touch a single drawer
A good plan is short. It answers three questions: when does the house need to look ready, how much stuff is there, and where will the stuff go. Most of the stress of trying to declutter house before selling comes from guessing at those answers while already holding a box. Ten minutes of planning at the kitchen table can save a week of rework later, and it gives you something to hand a helper, a mover or an agent who offers to coordinate.
What to decide first when you declutter house before selling
Before any sorting begins, write down the dates that matter. These usually include the day a stager or agent plans to walk through, the photography date, the day the listing goes live, and the first weekend of showings. If you are not yet working with an agent, the staging, photos and showings category collects the related decisions in one place. Then count backward and give each room a finish date.
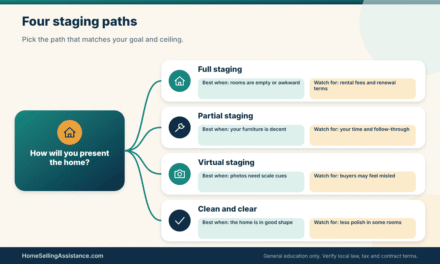
Next, decide how far you are willing to go. Some sellers want a light edit that clears counters and shelves. Others plan a deep reduction, where a large part of the household moves out early and the rest is thinned. Neither is wrong. The point is that you choose the level of effort to declutter house before selling before you start, because a half-chosen level produces a half-finished house, and half-finished is the hardest state to photograph.
Some sellers ask whether it is worth the trouble to declutter house before selling at all. Reasonable people disagree on how much it moves the needle, and nobody can promise a result. What we can say is that a calm, open house is easier to photograph, easier to tour and easier to inspect. Many sellers also find that the exercise forces choices they needed to make for the move anyway. Seen that way, the time you put in to declutter house before selling is partly packing you would have done regardless.
Evidence to gather: photos, dates, and storage quotes
Take wide photos of every room from the doorway, the way a buyer first sees it. Do not fix anything yet. Looking at those pictures a day later, with the goal to declutter house before selling in mind, you will notice the stacks, cords and crowded shelves that your eyes learned to ignore years ago. That is your honest baseline for the work to declutter house before selling, and it is far more useful than a mental list.
Alongside the photos, gather three things. First, the dates from your agent or your own calendar. Second, a rough count of boxes you expect, which you can estimate by room. Third, at least two storage options with written terms, such as a nearby storage unit, a portable container, or space with a relative. Quotes change, so treat any price you hear as a snapshot and confirm the monthly cost and the length of commitment before you sign.
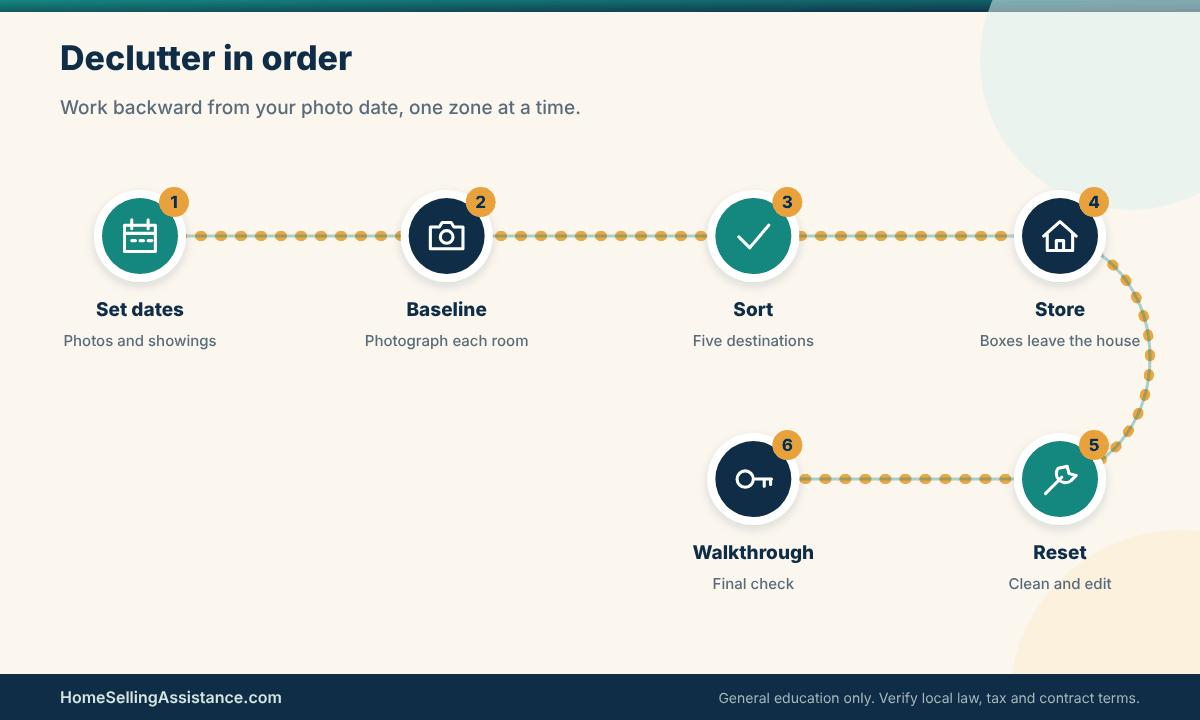
A common mistake is to treat the work as one giant weekend. When sellers declutter house before selling in a single push, they tend to run out of energy around the third room, and the last rooms get shoved into closets. Short sessions of an hour or two, spread across several days, usually produce better judgment. Keep a running list on your phone of what you have finished and what is left, so that the next session starts with a clear first move.
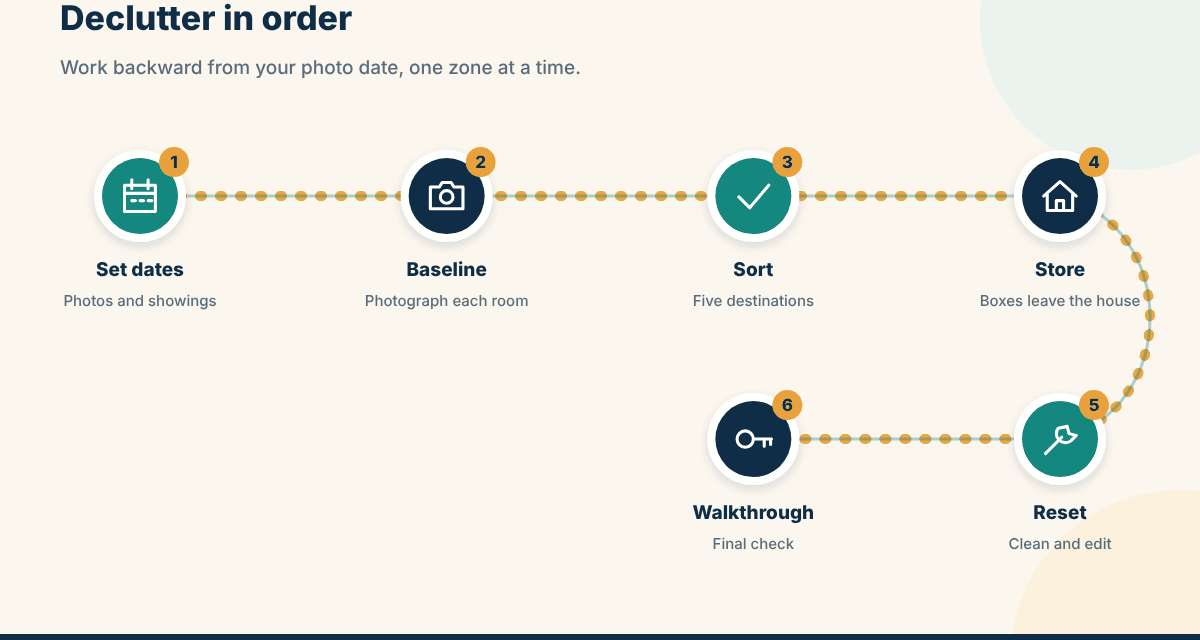
The picture above lays out the order in six steps. Dates come first, a baseline set of photos comes second, and the sorting, storing and resetting follow. The final step is the walkthrough, which most sellers forget to plan. Treat the sequence as a loose frame. You can move steps around, but skipping the baseline photos or the dates is the shortcut most likely to cost you time later when you try to declutter house before selling under pressure.
A scenario, an exception, and your next step: the three-week runway
Here is an illustrative example, using round numbers only. Suppose photos are booked three weeks from today and the house has five main rooms plus a garage. You might give week one to the garage and the closets, because those are where bulk lives and where the heavy decisions happen. Week two covers kitchen, bathrooms and bedrooms. Week three is the final edit, a deep clean and a day of rest.
An exception: if you are also packing for a move with a hard date, do not run two separate projects. Pack for the new home and declutter house before selling at the same time, using the same boxes. Your next step is simple. Pick the date, pick the garage or the hall closet as day one, and put the first appointment, even a donation drop-off, on the calendar.
The measurements people forget
Advice on how to declutter house before selling usually talks about feelings. A few plain measurements are more reliable. They turn a vague sense that the house feels full into something you can check, and they help you decide when to stop. Stopping matters. Without a stopping rule, sellers either quit too early or empty the house into an echoing shell that feels cold and makes the rooms look smaller.
Evidence to gather: floor, shelf and closet visibility
Three informal tests help. The first is floor visibility: in each room, can a buyer see most of the floor along the walkway and around the furniture? The second is shelf fullness: closets and pantries should look like they have room to spare, because buyers open them to judge storage. The third is surface clearance: counters, dressers and desks look larger when only a few intentional items sit on them.
These are guidelines, not laws, and they are not a substitute for local advice. A fuller closet in a small older house reads differently than in a big new build. If you work with a listing agent or a stager, ask them to point at the two or three spots that would bother a buyer most in your particular market, and focus there first. For more on how your agent can help, see how to prepare your house for showing.
A scenario, an exception, and your next step: when the stuff will not fit your next home
Many sellers are moving to something smaller, and the effort to declutter house before selling turns into a painful downsizing exercise. If that is you, the key move is to decide what the next place can hold before you decide what to keep. Measure the new rooms or request a floor plan, and set an honest limit, such as the dining set stays only if it fits the new dining area.
The exception is furniture that is too large for staging but is loved and useful. It can go to storage briefly while you decide, as long as you give the decision an end date. Our piece on downsizing and selling your home goes deeper on the emotional and practical side of that choice, and your next step is to write the cutoff date on a sticky note where you will see it daily.
Sort, store and live in the house in a sensible order
Once the plan exists, the sorting itself can move quickly, and to declutter house before selling you rarely need more than a few clear rules. The trick is to stop treating every object as a separate moral question. You are not deciding whether a thing has value. You are deciding where it should be during the next two to three months, and that is a much smaller question.
A sorting system that holds up when you declutter house before selling
Set up five stations before you start, even if they are only labeled spots on the garage floor. The first is pack, for things you will take to the new home but do not need before the move. The second is store, for items you want to keep but not in the house, such as seasonal gear or a spare dining table. The third is donate or sell. The fourth is discard. The fifth is keep accessible, for daily-use items that stay.
The fifth station deserves respect. Sellers who send everything away end up buying coffee filters twice and hunting for the vacuum cleaner at eleven at night. If you declutter house before selling without a keep-accessible station, you will quietly undo your work within a week, because life has to keep running somewhere.
Think of the five stations as a pipeline. Items enter from the room you are working in, and each station has an exit. Pack leaves with the movers, store leaves for the unit, donate leaves on pickup day, discard leaves with the trash or the hauler, and keep accessible returns to a shelf you have designated. If you declutter house before selling by following this pipeline, you will notice that the only thing that can pile up is the stuff that has not been assigned.
How to sort: a one-touch rule and a short timer
Pick up an item and decide once. If you cannot decide in about thirty seconds, it goes into a clearly labeled maybe box with a date on the lid. When that date arrives, anything still unopened is probably safe to let go, or it can ride along in storage. The maybe box is not a failure of nerve. It keeps momentum going and protects you from the one object that derails an entire afternoon.
Work in small zones, not whole rooms. A single shelf, one drawer, a closet floor. Finishing small areas gives you visible progress, and it keeps the house from sitting in a half-dismantled state that is stressful for everyone living there. Always finish a zone before you leave it, including carrying the donation bag to the car.
An illustrative case: a seller finds three boxes of children’s school projects while clearing a closet. Sorting each paper could take a weekend. Instead, they photograph the best pieces, keep one small bin, and pack the rest for later review. The exception is anything tied to a family member who needs a say, such as inherited keepsakes, where a quick call before discarding avoids a lasting argument.
Your next step: set a single sentimental bin per person in the household, with a size limit that you can see, such as one medium tote. Tell yourself that the bin is allowed to be full, and that what falls outside it can be photographed and released. If you are clearing a home after a family loss, our article on cleaning out an inherited house before sale offers a gentler pace.
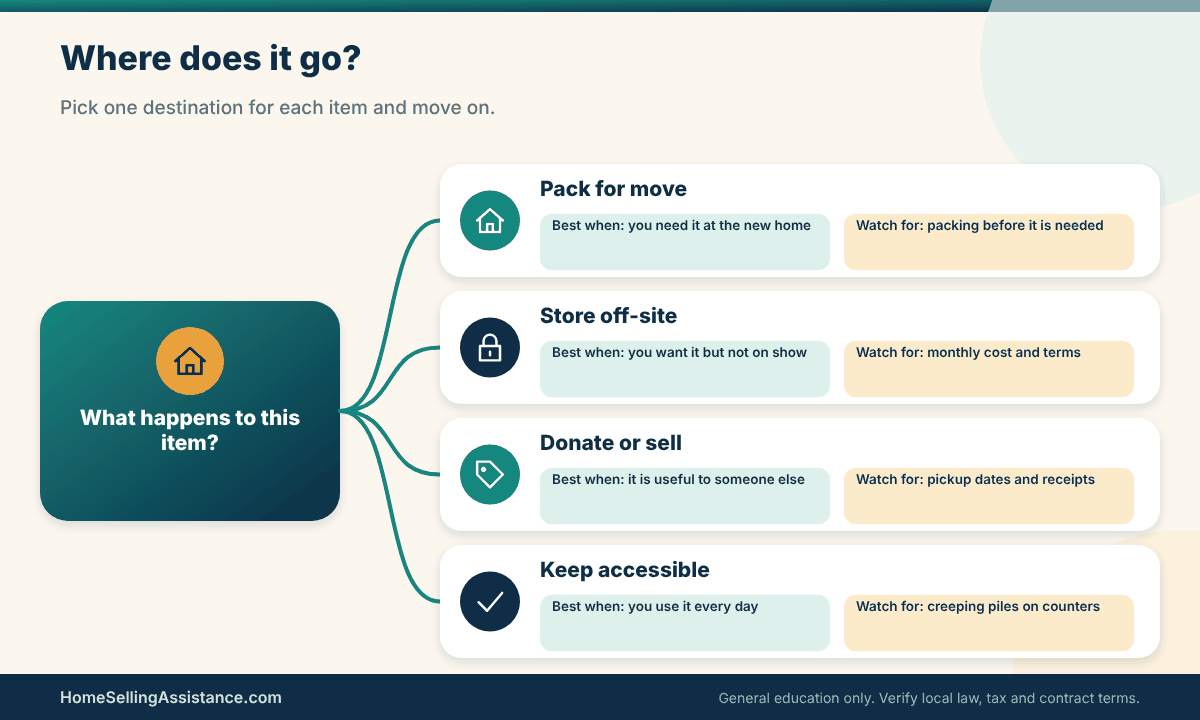
The picture above shows the five destinations you use to declutter house before selling as a simple decision fork. Use it as a quick reference when you are tired and tempted to leave things on the nearest flat surface. The right answer is almost always one of the five, and the wrong answer is almost always a pile that nobody has assigned.
The table below turns the process into a workflow. Think of it as a menu of stages rather than a script. Some homes need every row, and others, such as a tidy condo with one cluttered spare room, need only two or three. Read across each row to see what to collect, what to do, when the decision has to be made, and who gets the item next.
| Stage or symptom | Information to gather | Action | Decision deadline | Next handoff |
|---|---|---|---|---|
| Garage packed to the walls | Box count, storage quotes | Sort into five stations | Before photos are booked | Storage unit or donation pickup |
| Closets overflowing | Seasonal versus daily items | Pack off-season clothing | One week before photos | Labeled boxes in storage |
| Counters crowded | Daily-use appliance list | Keep two or three, store the rest | Day before photos | Kitchen cabinet or garage shelf |
| Personal photos everywhere | Which frames matter most | Pack most, leave a few neutral pieces | Before first showing | Labeled box, safe location |
| Excess furniture | Room measurements, photos | Remove pieces blocking walkways | Before staging walkthrough | Storage, sale or family |
| Basement or attic storage | Moisture and access check | Thin and shelve neatly | Before inspection window | Donation, dump or shelves |
One more point about the schedule. If you declutter house before selling while also working full time, your weekend hours are your real capacity, so be honest about them. Two focused weekend mornings and a couple of weeknight sessions will usually beat a plan that assumes you will clear a whole room every evening. Build in a buffer, because storage delivery, donation pickups and weather rarely line up the way you hope.
To use the table, copy the rows that apply to your home into a notes app and add a date beside each. Notice the last column. Every stage ends with a handoff, which means every box has a place to go that is not a corner of the living room. When a row stalls, it is usually because the next handoff was never arranged, so call the donation pickup or the storage office first and sort second.
Sellers who declutter house before selling often work on the wrong things. They empty a closet that nobody will open and leave the entry table stacked with mail, keys and shoes that buyers see in the first five seconds. Take your baseline photos again after the first sorting pass and compare. Look for the places the eye lands first: the entryway, the kitchen counter, the primary bedroom and the main bathroom.
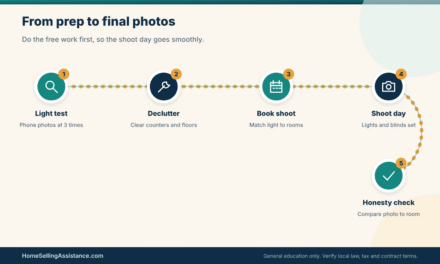
A photographer or stager will typically care most about sight lines, meaning what a camera sees from the doorway of each room. If your photographer shares a prep list, follow it over any generic advice, including ours. Our article on real estate photography for sellers explains what to ask for before the shoot day.
One room in many houses refuses to cooperate. It might be a home office filled with paperwork or a spare bedroom that has become the household catch-all. Instead of letting it hold the whole project hostage, set a limit. Everything loose goes into labeled boxes, and the boxes stack neatly in one corner or move to storage. That is not cheating if the room is functional and photographs well.
The exception is paperwork you may need for the sale, such as the deed, tax bills, warranties and past repair receipts. Keep those in one folder you can reach quickly, and check our list of documents needed to sell a house before anything gets boxed. Next step: label the box and write the room name and a short contents list on two sides.
Buyers do not open every drawer, but they do open the doors that matter. When you declutter house before selling, kitchens and bathrooms get the closest attention, closets tell the story of storage, and garages and basements tell buyers whether the house has room for their own belongings. Starting with these areas tends to give the largest visible change per hour of effort.
Kitchens, bathrooms and closets: where buyers look closest
In the kitchen, aim for clear counters with a few intentional items, and thin out the pantry and the cabinet under the sink. Duplicate gadgets, expired food and half-used cleaning products can go. In bathrooms, a clear vanity and a tidy shower look cleaner than any amount of scrubbing. Keep daily toiletries in a small caddy that can slide under the sink when a showing is scheduled.
In closets, remove about as much as it takes to see the floor and the wall behind the clothes rod. Matching hangers, if you have time, make a small but noticeable difference. Shoes can go into a few labeled bins. If you are tempted to cram things in before an appointment, remember that a buyer opening an overstuffed closet is a buyer wondering where their own things will go.
These are the spaces where sellers hide clutter, and buyers know it. A garage that contains shelving, a clear path and visible floor space reads as functional. A garage packed to the ceiling reads as a problem to solve after closing. If safety items like paint, fuel, pesticides or old batteries are in your garage, check with your local waste authority about disposal rules, because many communities have specific drop-off days or sites.
Basements and attics deserve a moisture and access check before you stack anything. Cardboard on a damp floor can invite mold, which creates problems at inspection. Move things up onto shelves or plastic bins. Outside, remove hoses, toys, extra planters and anything that makes the yard look busy; our guide on curb appeal before selling a house pairs well with this step.
The work to declutter house before selling creates a second problem: the sorted things need somewhere to go. This is where many projects slow down. The boxes are labeled, the donation pile is tall, and the car is full of items nobody has time to deliver. Logistics are not glamorous, but they decide whether your effort turns into a clear, photo-ready house or into a new kind of mess in the garage.
Storage, donations and daily life while the house is listed
You have a few realistic choices for belongings that are leaving the house but not leaving your life. A rented storage unit is the common one. A portable container delivered to your driveway is another, though some neighborhoods, HOAs and cities restrict how long a container can sit outside, so check before you order one. A relative’s spare room costs nothing but depends on goodwill. A new home that you already own, if you are buying first, can serve as a landing zone.
Each option changes your budget and your risk. Off-site storage costs money every month. A container in the driveway may show up in listing photos unless it is gone by shoot day. Family storage costs nothing but creates a debt of gratitude. None of these is automatically better, so match the choice to your timeline, your budget and how much needs to move.
Evidence to gather: storage terms, access and insurance
Ask any storage provider for the terms in writing. Useful questions include the monthly rate and whether it can rise, the minimum rental period, any move-in or administrative fees, access hours, and what the facility requires regarding insurance on your belongings. Your homeowner’s or renter’s policy may or may not cover items kept off-site, so ask your insurer rather than assuming. If you hire movers, read the estimate carefully and compare more than one; the Federal Trade Commission’s consumer site offers general guidance on checking a moving company and spotting common scams.
Write down what you place in storage. A simple spreadsheet or notes list with box numbers and rooms makes a later move much easier, and it doubles as a record if something is damaged. Keep it where you can reach it from your phone. For valuables like jewelry, important documents, firearms or irreplaceable keepsakes, consider keeping them with you or in a secure place you trust instead of a shared facility.
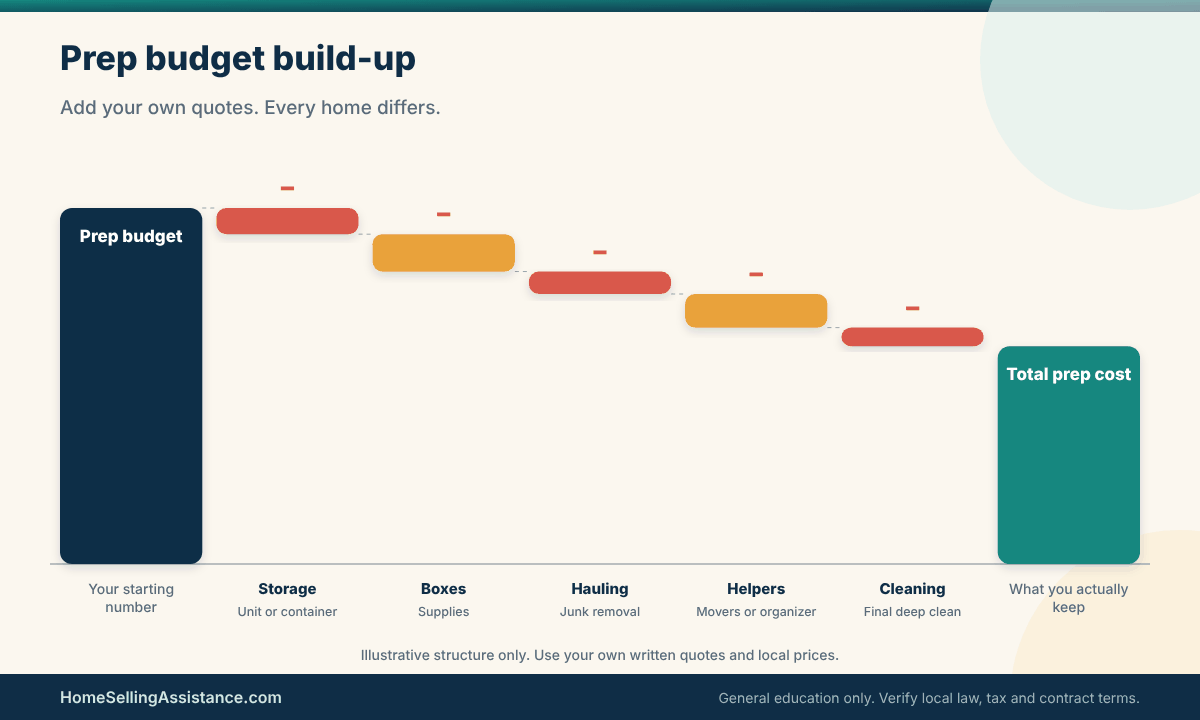
Money deserves a plain conversation too. The cost to declutter house before selling can be small if you sort and donate, or noticeable if you rent storage for several months and hire help. Neither is a mistake. The mistake is not knowing the number until the bills arrive. Add the monthly cost of storage to your closing timeline, and think about what happens if the house takes longer to sell than you hoped.
The illustration above shows how the budget to declutter house before selling can build up from several small pieces. All numbers will be your own, since storage, hauling and helpers vary widely by area, so treat the picture as a structure for your own quotes rather than a price list. Add up the pieces before you commit, and compare the total to the time you would spend doing everything yourself.
Imagine a seller with a decent dining set, a bookshelf and a dozen bags of clothes. Some items could sell online, but each sale means messages, meetings with strangers and scheduling. Others could go to a charity that offers pickup. A fair rule is to sell only items that are clearly worth the effort, and to donate the rest on a set date. For safety around meeting strangers, our piece on the home seller privacy checklist has useful habits, such as moving items to the porch or garage instead of letting strangers inside.
The exception is anything where you want a tax deduction for the donation. Whether a deduction applies, and how it is documented, depends on your own tax situation and on current IRS rules, so check the IRS website or ask a tax professional. Ask the charity for a receipt, and take dated photos of what you gave. Next step: schedule the pickup today, even if it is three weeks away, because a booked date creates a deadline for the sorting.
Another warning concerns anything you are tempted to throw away. Check with your local waste authority or city website about bulk pickup days, paint and chemical drop-offs, and electronics recycling. Some places charge for large items, and some require appointments. A dumpster rental can be efficient when the house has years of accumulation, but ask about size, weight limits, delivery placement and permits before you order one.
Once you declutter house before selling, the next challenge is keeping it that way while you continue to live there. Showings can arrive with short notice, and the version of your home that a buyer sees should match the version in the photos. This is easier when you have a few small systems in place rather than a heroic effort every time someone wants to visit.
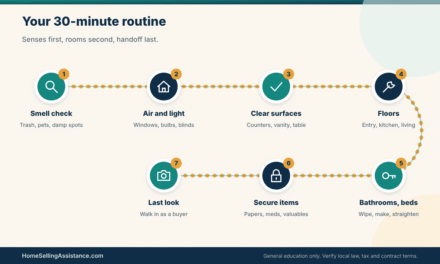
Think of the house as having two modes. In normal mode, your family lives in it. In showing mode, it looks like the photographs. The goal is to make the switch take about fifteen minutes. Anything that makes the switch take longer, like a pile of papers on the dining table, needs a permanent home. Our guide on what the seller does during a showing covers the other half of this routine, including where to be while buyers are inside.
The accessible-essentials box and the daily reset
When you declutter house before selling while still living there, create one or two containers for daily items that will not appear in the house during a showing. Typical contents include a few days of medications you keep at home, chargers, a laptop, school items, mail, favorite mugs, pet supplies, and cleaning supplies for quick touch-ups. A laundry basket with a lid, kept in a car trunk or a closet, works well for this. When an appointment is booked, you grab the basket, wipe the counters and go.
The daily reset is a short routine at a set time: dishes done, counters cleared, beds made, floors checked, trash emptied, and lights on. A household that does this every evening is rarely surprised by a showing request. Assign tasks if several people live there, and write the list on a card in the kitchen. If you work from home, plan where your workspace goes when buyers arrive. A rolling cart is easier to hide than a full desk.

Households differ in how much structure they need. Some people thrive on a nightly checklist, and others prefer a weekly deep reset plus a ten-minute tidy before each showing. Whichever fits you, the point is that your habits keep the house in the state you reached when you finished the work to declutter house before selling. Without a routine, clutter creeps back through mail, laundry and shopping bags, usually within days.
Illustrative example: a family with two young children and a dog is listed. The kids’ toys live in two lidded bins in a closet, the dog’s bowls and bed are tucked in the laundry room, and a parent works at a dining table that clears off in minutes. Not perfect, but workable. The exception is a household with unusual needs, such as medical equipment, a home daycare or an adult who is home during the day. In those cases, tell your agent early so showings can be scheduled with notice and set windows.
If pets are part of the picture, our article on selling a house with pets goes into odors, safety and what to do on showing days. For a practical next step, run a dry run this week: set a timer, switch to showing mode and see how long it takes. If it takes more than twenty minutes, find the one or two obstacles and give them a permanent home.
Close the loop after you declutter house before selling
When you declutter house before selling and the closets are clear and the boxes are gone, it is tempting to call the project finished. It is not quite. A house where you manage to declutter house before selling creates new questions, mostly about what the buyer thinks is included, what you plan to take, and what happens to the house between the photo shoot and the final walkthrough. Handled loosely, these questions turn into last-minute disputes. Handled in writing, they usually disappear.
What to confirm in writing about items that stay or go
Many sellers also forget that the listing itself makes a promise. If your photos show a mantel arrangement and you plan to keep every piece, a buyer who tours in person should not be surprised. After you declutter house before selling, review the photos and the listing remarks together and ask whether any item shown could be mistaken for an included one. If the answer is maybe, add a line.
In general, items attached to the home, such as built-in shelving, light fixtures, ceiling fans, installed window hardware and permanently mounted equipment, are often treated as part of the property. Loose items such as furniture, rugs and freestanding decor usually are not. But the line is fuzzy, local custom varies, and what counts in your state depends on your contract and local rules. The safest habit is to avoid relying on the general rule and to list anything unusual explicitly.
Because you have just spent weeks working to declutter house before selling and removing and rearranging things, you are more likely than most sellers to have moved something a buyer noticed in photos or at a showing. If a chandelier sits in a box in the garage, or the curtains are gone but the rods remain, the listing and the contract should say so. Your listing agent or attorney can help you word it. Remember that real estate practice varies widely across states and counties, so ask a local professional how items are normally handled.
Evidence to gather: fixtures, appliances and what the listing promised
Make an inventory of everything the buyer could reasonably assume is included, then check it against the listing description, the photos and any seller questionnaire you completed. Mark each item as stays, goes or negotiable. This is also a good moment to check whether any item is rented, leased or financed, such as a water softener, a solar system or a security system with a contract, because those can involve third parties who must be told.
The table below is a transaction check table. It groups the usual issues that surface after you declutter house before selling and shows what you should have in hand, who else may need to weigh in, and what the risk is if you skip it. Use it as a conversation starter with your agent, your attorney or the title company, not as a substitute for local advice.
| Issue | Seller evidence | Buyer, agent or title input | Risk if skipped | Fallback |
|---|---|---|---|---|
| Fixture removed after photos | Dated photos, inventory list | Agent updates listing remarks | Buyer claims item was promised | Replace it or offer a small credit |
| Appliance listed as included | Model and condition notes | Contract line naming the item | Dispute at final walkthrough | Written addendum before closing |
| Leased equipment on the property | Lease or service contract | Title or agent confirms transfer terms | Surprise payoff or removal fee | Contact provider early |
| Items left behind on purpose | Written list, photos | Buyer agrees in the contract | Buyer expects empty house | Hire hauler before move-out |
| Hazardous materials stored | Disposal receipt or drop-off proof | Inspector may flag at inspection | Safety concern, delay | Remove through local program |
| Stored belongings off-site | Storage contract and inventory | Agent knows move-out timing | Rent overlap, lost items | Short-term extension in writing |
To make the table useful, replace the generic rows with your own items and add a column for the date you resolved each one. If you see a row where the buyer’s input is required, ask your agent to raise it before the contract is signed rather than after. A short addendum is easier to write when everybody is still in a good mood.
A scenario, an exception, and your next step: the buyer asks for the washer
Picture this. A buyer’s agent calls after the inspection and asks whether the washer and dryer convey. Your listing said nothing, and the appliances are in the photos because you staged the laundry room. You may want to keep them, sell them, or leave them. Any of these is fine, but the answer should be a written amendment to the contract, with the item named and any price or credit spelled out.
The exception is when something is clearly personal property that a buyer cannot reasonably expect, like family heirlooms or a piece of art on the wall. Even then, a short note in the listing remarks, such as an exclusion for specific items, avoids confusion. Next step: walk through the house with your agent and a notepad before listing and say out loud what is staying and what is leaving. The tree below shows one way to decide what happens when a buyer asks about an item.
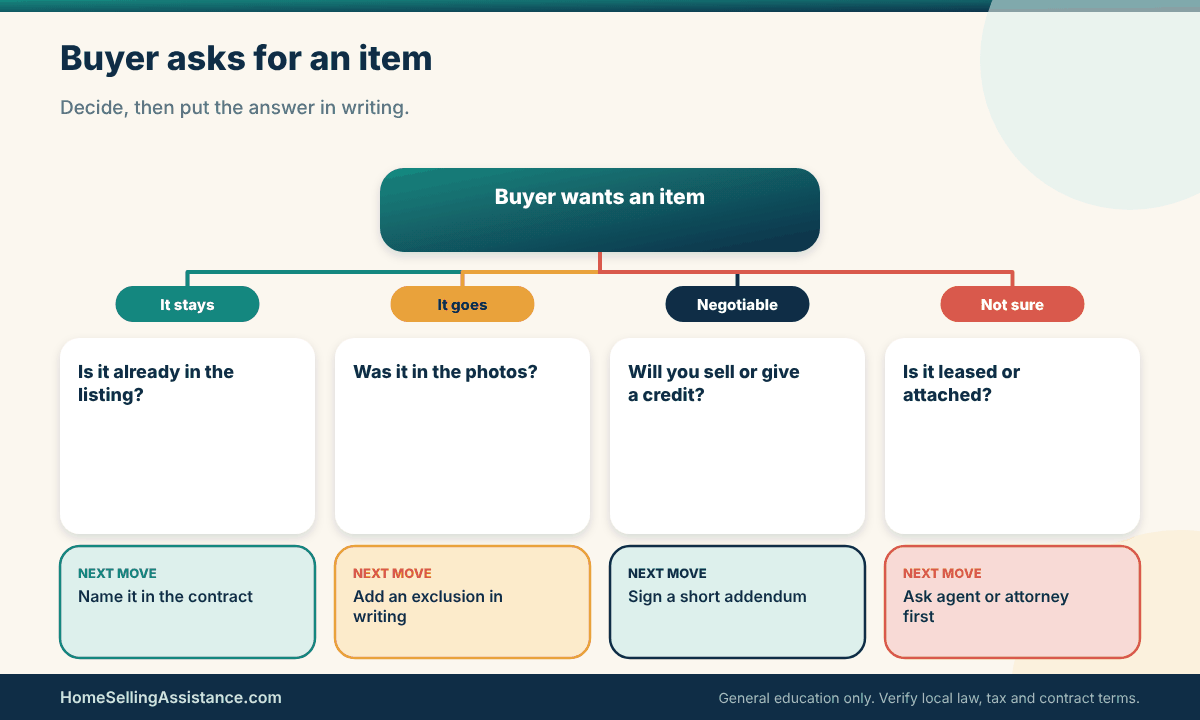
Notice that every branch ends in writing. That is the pattern worth remembering. Whether you say yes, no or let us talk about a credit, the outcome becomes an addendum, a revised listing remark or a line in the contract. Verbal agreements fade, particularly when closing is weeks away and several people are involved.
Protecting the result through closing and afterward
The effort to declutter house before selling has to last through the whole period between listing and closing is harder than getting there. Showing requests, inspections, appraisals and move preparation all invite stuff back into the house. A buyer’s inspector, for example, needs to reach the electrical panel, the water heater and the attic hatch, and an appraiser needs to walk each room. A cluttered path can slow down both, which makes your work harder to defend.
It also helps to think about security. A house that is partly emptied, with valuable items in storage and a lockbox on the door, is different from a lived-in home. If you have moved out already or plan to, our article on vacant home security for a house on the market covers locks, lighting and neighbors, and the guide to moving out before selling a house compares the trade-offs of leaving early.
Evidence to gather: a final walkthrough routine
Before the buyer’s final walkthrough, which usually happens shortly before closing, run your own. Confirm that the house is clean, that the items you agreed to leave are present, that the items you agreed to take are gone, and that any repairs or credits in the contract have been handled. Take dated photos of each room and keep them. If you left anything behind that was not agreed, expect to be asked about it.
Check closets, the garage, the attic, the shed and the crawlspace for forgotten boxes, because those are the places that surprise people. Collect all keys, garage remotes, gate codes, alarm information, manuals and warranties for the appliances that stay. Put them in a labeled envelope or a single box so they can be handed over cleanly, and so you are not searching for them on moving day.
A scenario, an exception, and your next step: records, receipts and what to keep
A seller finishes closing, sends the last boxes to the new home and wonders what paperwork to keep. Receipts from storage, hauling, junk removal and donation may be relevant to your records, but whether any of them affect taxes depends on your situation, so ask a tax professional and read IRS Publication 523 on selling your home. Our guide to home sale tax records explains the types of documents sellers commonly keep.
The exception is anything you were not sure about while sorting. If the maybe boxes are still unopened a month after closing, you have your answer, and most people find the exercise lighter than they feared. Your next step is to save a folder, digital or paper, with the listing, the inventory, the contract addenda, the closing statement and a few photos, and to keep it somewhere that you will find in a few years.
A last reflection. Sellers who declutter house before selling often say the hardest part was not the sorting but the decision to start. If that is where you are, pick the smallest zone in the house, set a timer for twenty minutes and do only that. Momentum is real, and the next zone will feel easier. Over several short sessions, your plan to declutter house before selling becomes a finished project instead of a worry.
Quick scenario
A couple decides to declutter house before selling and has three weeks before photos. They book a storage unit on day one, spend the first weekend on the garage, clear counters and closets the next weekend, and keep one lidded basket of daily items by the door. On the night before the shoot they do a fifteen-minute reset and photograph each room themselves. Nothing here is guaranteed to change a result, but the house is calm, the paths are clear and nobody is searching for the phone charger in a box.
Frequently asked questions about declutter house before selling
How early should I start to declutter house before selling?
As early as your timeline allows, since the sorting is the slowest part and storage may take time to arrange. Many sellers begin several weeks before photography, and some start a few months ahead when the house holds years of accumulated belongings. If you are short on time, focus on the entry, the kitchen, the primary bedroom and the garage first. Ask your agent for a realistic order based on your market.
Do I need to declutter house before selling in closets and cabinets that buyers might not see?
Yes, usually, because buyers do open closets and cabinets to judge storage space. An overstuffed closet can suggest that the house is short on room even when it is not. You do not need to empty them, only leave visible breathing space. Pack seasonal items and anything you do not use weekly.
Should I rent storage or use a portable container?
It depends on cost, space and local rules. A storage unit keeps belongings away from the property, while a container is convenient but may be restricted by a city or an HOA and could appear in photos. Compare written terms, access hours and insurance questions for each. Neither is better in every case.
How much should I remove before I list?
There is no universal amount, and any specific percentage you read online should be treated with caution. A useful test is whether buyers can see floors, counters and shelf space, and whether each room has a clear purpose. A stager or agent familiar with your neighborhood can tell you what is typical locally. Take photos and judge honestly.
Is it better to hire a professional organizer or stager?
That depends on your budget, your time and your emotional distance from the belongings. Some sellers find that an outside voice makes decisions faster, and others prefer to handle the job with family. Ask for written pricing and what is included, and check references. Neutral advice helps most when it is specific to your house.
What should I do with personal photos and family items?
Most staging advice suggests packing most personal photos and keeping a few neutral pieces so the home feels welcoming but not tied to one family. This is about helping buyers imagine their own life there, not about hiding anything. Valuables and sentimental items are best stored somewhere secure. Avoid making any assumptions about who your buyers are, and follow the HUD fair housing guidance if you are ever unsure how to talk about a prospective buyer.
Can I take fixtures or appliances if I declutter house before selling?
Sometimes, but it depends on your contract, your listing and local practice. Items that are attached to the house are often treated as part of the sale, so if you plan to keep a fixture, say so in writing before the buyer’s offer. Your agent or attorney can help you word an exclusion. Do not rely on a verbal agreement.
How do I live in the house after I declutter house before selling?
Use a small accessible-essentials basket and a short daily reset routine, and keep a clear place for everyday items out of sight. Plan where you will be during showings, and give your agent notice windows if your household has special needs. It is a temporary arrangement, so keep it simple. Most people adjust within a week or two.
What if the buyer’s inspector or appraiser finds my stored items in the way?
Make sure the electrical panel, water heater, attic hatch and crawlspace access are clear before inspection day. Inspectors may note limited access, which can create delays or follow-up visits. Walk through the house with your agent a few days earlier and fix any blocked areas. It is a quick check that protects your effort.
Do I have to disclose anything I find as I declutter house before selling?
Possibly. If you uncover water stains, pest evidence, hidden damage or something else that affects the property, your state may require disclosure, and rules vary. Do not hide or paint over what you find. Ask your listing agent or a real estate attorney how disclosure works where you live, and keep a written record.
Before you pick up the first box
To declutter house before selling is mostly a matter of order: pick your dates, size the job, give every item a destination, arrange storage and donation pickups early, keep a livable system running, and write down what stays and what goes. You do not need a perfect house, just a clear, honest one. For the rest of the staging picture, return to our complete home staging guide. This article is general education, not legal, tax or financial advice, and rules vary by state, so confirm the details that affect you with a licensed local professional.